
Important notice: This post is about the legacy Nabto 4/Micro platform which has been superseded by the Nabto 5/Edge platform. Also see the general comparison of Nabto 4/Micro (uNabto) and Nabto 5/Edge.
Today we will have a look at Snappy Ubuntu Core, why it is nice, in principle, and why it still has some way to go before it will really be useful in reality.
Snappy Ubuntu Core, the basics

Snappy Ubuntu Core is “a new, transactionally-updated Ubuntu for IoT devices, clouds and more”. In other words, it’s a new rendition of Ubuntu with some new features as well as a lot of features removed, which we will get back to. It should be noted that the system is also referred to as simply Ubuntu Core (not even the name is set in stone yet) so you will see both ways of writing it in this post. The main selling point of this free product is that each app, hereafter denounced snaps, are independent blocks, ideally with no external dependencies. This has the huge advantage that a snap can be installed or removed without breaking anything else on the machine. The system can thus be seen as being build by legos, individually separated but put together into a full system.
Installing Ubuntu Core
Getting a copy of Ubuntu Core is fairly straightforward if you just follow the instructions laid out here. As you will quickly notice, Ubuntu Core is available for quite a number of devices although only the Raspberry Pi 2 is supported out of the Pi family at the moment. For IoT projects it does not make a whole lot of sense to run a virtual Ubuntu Core image on a desktop system, but for developing I used it extensively.
So either run a virtual machine using kvm or get your Pi 2 up and running if you feel like following along!
Installing a snap
Once we have Ubuntu Core up and running we can either SSH into it by issuing ssh -p 8022 ubuntu@localhost (virtual kvm) or ssh [email protected] (Pi2) both with the standard password: ubuntu. Once in, let’s start by getting an overview of the stuff already installed on the machine. We do this by issuing
$ snappy list
The listed items can be either kernels, daemon services or executable binaries, basically everything that makes up our environment.
You should see something like Name Date Version Developer ubuntu-core 2016-01-28 7 ubuntu webdm 2016-01-28 0.11 canonical pi2 2016-01-28 0.16 canonical
First of, version 7 of the ubuntu-core is quite old so we run
$ sudo snappy update
to update the system. If webdm is not installed already, then we also install it by issuing
$ sudo snappy install webdm
This service basically gives us a graphical user interface to the Snappy Store which we can access if we are on the Pi2 by opening a browser (on desktop machine) and going to webdm.local:4200.
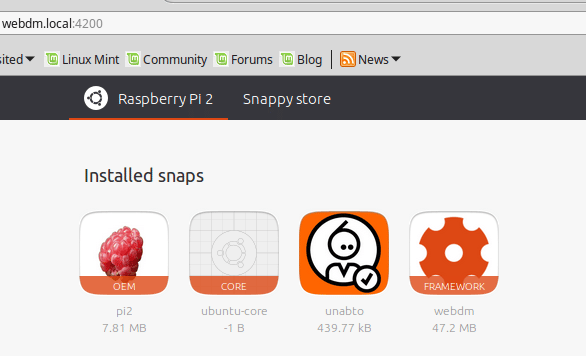
Here we basically see the graphical presentation of what we just saw in the command line. We can also see the available snaps for this architecture. Going back to the command line we can also get a list of all the available snaps for the current architecture by issuing
$ snappy search '*'
At the time of writing this (10th of May 2016) there are exactly 100 snaps available for the Pi2 and 92 for amd64 so the framework is still in its infancy. To search for a specific app we try searching for the unabto snap
$ snappy search unabto
if successful we can install it as before, by issuing
$ sudo snappy install unabto
After it installs, we can try issuing
$ unabto.unabto
which will work perfectly on a 64 bit machine but on the Pi2 we will see this error
$ wiringPiSetup: Must be root. (Did you forget sudo?)
trying the same command with sudo will result in
$ wiringPiSetup: Unable to open /dev/mem: Operation not permitted
to find out why, we need to have a look at how snaps are created
Creating a snap
As mentioned, the number of available snaps to install is still fairly limited and so is the documentation for creating snaps. Through the iterations of the build tool and the Ubuntu Core itself, the specific commands and instructions have changed and there is thus no consensus on how to actually do essential things. Many of the examples given cannot compile with my version of their build tool, called snapcraft. But still, we march on and we will begin with the way Ubuntu Core wants you to use it. On my amd64 machine I installed snapcraft by following the instructions here ` $ sudo add-apt-repository ppa:snappy-dev/tools $ sudo apt-get update $ sudo apt-get install snapcraft `
To get a feel of how snapcraft “crafts” programs into snaps we issue
$ snapcraft help plugins
to see all the steps that snapcraft does behind the scenes. For future reference the version I used was 1.1.0 on Linux Mint 17.3 Cinnamon 64-bit. The only thing we really need to get something going for us is a snapcraft.yaml file as well as an icon. snapcraft.yaml contain instructions for snapcraft so that it knows what to do. In our simple example we write (you can find this code on github as well)
# Notice! Name cannot contain underscore
name: unabto-test
version: 0.1
summary: some summary
description: some description
vendor: [email protected]
icon: icon.png

# Needed packages. If not found on system, snapcraft will install them
build-packages: [openssl, cmake, git]

# To be able to call the binaries in our snap directly from the command line we define binaries
binaries:
  # note, the name to write for
  # executing the binary below it. These two names cannot
  # be the same !
  unabto:
    exec: bin/unabto_raspberrypi
    # We have to allow the bin/binary to open
    # sockets and the like. For this, we use set permissions using the plugs term
    plugs: [network-bind]

# The parts the snap will consist of
parts:
  unabto:
    plugin: cmake
    source: git://github.com/nabto/unabto.git
Note that the above example is NOT exactly how most of the examples found in the Ubuntu Core github are made at the moment (most of them cannot compile with my version of snapcraft). I suspect this is due to differences between releases and will probably be resolved in time. Having the snapcraft.yaml file and icon.png in the same folder, now comes the magic! Simply issue
$ snapcraft
Which will go through the stages laid out in $ snapcraft help plugins. You will notice that the directory now contain
unabto, parts, stage and snap as well as what we are actually interested in, unabto_0.1_amd64.snap, which is our snap! So yeah, that was really all we needed to create a standalone snap, wow !
Now we would like to check out how it works. You will no doubt have noticed the _amd64 in the filename, meaning that this snap is for an Ubuntu Core 64 bit machine. The reason for this is that snapcraft does not support cross compiling (I could not get it to work, at least) and we will later see how to circumvent this. For now, we transfer and install our newly created snap on our virtual machine by issuing
$ snappy-remote --url=ssh://localhost:8022 install unabto_0.1_amd64.snap
This should run without any problems. We can check if the snap was succesfully installed by sshing into the virtual machine and issue $ snappy list as before. unabto should now appear on the list and we can run the binary we specified in the snapcraft.yaml file by issuing
$ unabto-test.unabto -d id -s -k key
where id and key is created at developer.nabto.com If everything went as it should you will see a few lines of output ending with
$ 00:04:32:160 unabto_attach.c(575) State change from WAIT_GSP to ATTACHED
which is a sign of success ! We can now access the id in a browser and thus remotely control whatever unabto is running on, great success ! To see some real life uses please check out The CoffeePi (Part 1 of 2), The CoffeePi (Part 2 of 2) and The SunPi control center
Creating a multi architecture snap and creating some actual value into it
Now, I already said snapcraft can’t do crosscompiling so we need to do something else. The easiest way is to create a binary the old fashioned way for each architecture. For this we simply need a compiler for that architecture, as the name suggest. I used this to compile for the raspberry pi. Simply download it and go to the unabto/apps/raspberry_pi folder. If you don’t already have a copy of the uNabto SDK, you can grab one here. In this folder we issue
$ export CC=path/to/raspi_gcc
before issuing the usual
$ cmake .
and
$ make
We can check if the resulting binary really was compiled for an arm board by issuing
$ file raspberry_binary
which should return something like
$ unabto: ELF 32-bit LSB executable, ARM, EABI5 version 1 (SYSV), dynamically linked (uses shared libs), for GNU/Linux 2.6.26, BuildID[sha1]=cbb7dfe8560ba3e63dfffa621cad56f301fff1e7, not stripped
Make sure your main snap folder contain a bin, lib and meta folder as can be seen in the uNabto Ubuntu Core github repository. In bin we create a folder for each architecture as well as an executable that makes sure which to choose depending on the device. You can check that out on github as well. In meta we need an icon, a readme.md and a file almost like before, but this time called package.yaml
name: unabto
vendor: Marcus Therkildsen
architecture: [amd64, armhf]
icon: meta/icon.png
version: 0.1

binaries:
- name: bin/unabto
This time we notice that we defined “architecture: [amd64, armhf]” which should list all the archs we plan on incorporating in our multisnap. Now we can simply issue
$ snappy build
which will create unabto_0.1_multi.snap. This snap can now be installed on all the architectures we compiled each package for. This is done in the same way as before using the snappy-remote command. Again we can run it by issuing
$ unabto.unabto -d id -s -k key
and voila, we now have a working multi arch snap. Still, the snap doesn’t really do anything other than controlling a dummy switch in the unabto code
Adding functionality
So what if we wanted to use the gpio pins on the RPi2? Well, all functionality that a snap should have should be contained in the snap itself. That is, after all, the main selling point of Ubuntu Snappy Core. If you had the audacity to try to do anything on Ubuntu Snappy Core anyway you would quickly realise that
curl wget apt-get make cmake
and many other commands we are used to from Linux is missing. Ubuntu Snappy Core is truly not made for creating anything ON but made for executing stuff made for it on a different, ordinary linux distro. This gets really frustrating fast until you accept that this is the premise of Ubuntu Snappy Core.
The library I usually use for controlling gpio pins on any Raspberry Pi is called wiringPi so we are going to compile that for our Pi2 and add it as a library. I ended up busting out my old Pi1 to compile the wiringPi library, then transferred it to my 64 bit machine and put it into lib/arm-linux-gnueabihf, as can be seen here. For future reference, these binaries are wiringPi 2.29. Again, I compiled using snappy build and got a nice multi arch snap which we install as before.
Back on the Pi2 we issue
$ unabto.unabto
and are met with
$ wiringPiSetup: Must be root. (Did you forget sudo?)
and with sudo
$ wiringPiSetup: Unable to open /dev/mem: Permission denied
which leaves us exactly back at where we started. So I tried many things to get this working. Since the newest version of wiringPi has a workaround for running without sudo (which I actually got working on my Pi1 running Raspbian) I tried to do the same thing here. This involved remounting the read-only filesystem to make it writable, move around some libraries, add some paths and so forth. This totally goes against the Ubuntu Snappy Core principles and ultimately did not work anyway. Now, if we run snappy -h on our Pi2 we see there is a way of assigning a hardware device to a package. We try that by issuing
$ sudo snappy hw-assign unabto.nabto /dev/mem
but it still did not work. Thus, we saw that we cannot add hardware support the way Ubuntu Snappy Core states at their website and we really should not be messing around with remounting the filesystem.
This leaves us with the compromise of creating a custom wrapper, setting the library paths and calling the correct executable. This is already in the package (run_unabto) so what we ultimately have to do to finally get something working is this: Just after sshing into you Pi2 Ubuntu Snappy Core, issue this
$ echo "alias run_unabto=/apps/unabto.nabto/current/bin/arm-linux-gnueabihf/run_unabto" >> .bashrc
and then reboot. After this, we are now able to write
$ run_unabto -d id -s -k key
where id and key are found at developer.nabto.com and unabto should finally be running, wopeeh! But what is perhaps even more interesting, is the fact that if we hook up an LED to wiringPi pin number 0 we actually control something now instead of just the dummy switch we saw earlier plus we are as close as can be to the philosophy of Ubuntu Snappy Core: snaps should be selfcontained. If we decide to remove unabto by issuing
$ sudo snappy remove unabto
and
$ sudo snappy purge unabto
the only remnant of unabto will be the last line in our .bashrc file and I can live with that.
Whuu, that was a bit of a mouthfull!
As seen, it is definitely possible to create snaps for Ubuntu Snappy Core. With time, glitches like examples that won’t compile and outdated tutorials will hopefully be fixed.
If nothing else, it is now possible to run unabto on Ubuntu Snappy Core and actually do something useful with it !
To finish things of, you can publish your snap to the Ubuntu store very easily by following the instructions here. If you would like to check out the code we used for creating the uNabto snap, please check out the relevant github repository. If you would like to see how to add some more funtionality into your own uNabto snap, please check out The CoffeePi (Part 1 of 2), The CoffeePi (Part 2 of 2) and The SunPi control center.