
A few days ago (29/2-2016) the new Raspberry Pi 3 was announced. Of course we were all excited here at the Nabto headquarters and quickly bought a few.
Since they are reviewed as the perfect platform for IoT we wanted to check out if it is perfect for Nabto as well. Spoiler alert: it is !
Setting up the Pi 3
The fastest way to get wifi and Nabto up and running on your Pi 3 is to burn an image to your sd card (for this post we are using Raspbian Jessie Lite). After doing that, hook up your Pi3 by wire to your local network. You can now access the Pi, either directly by HDMI and a keyboard or over SSH.
One of the main features of the new Pi3 is the onboard wifi module so the first thing to do is to search for available networks and make the Pi autoconnect to the one we want. This is most easily done by issuing the following commands one line at a time.
wpa_cli scan scan_results add_network set_network 0 ssid "ssid_name" set_network 0 psk "password_stuff" enable_network 0 save_config quit
Where you should, of course, replace ssid_name and password_stuff with the SSID and password of the network you are trying to connect to. After that you can reboot the Pi and remove the wire and you have a Raspberry Pi 3 ready for IoT!
Setting up Nabto
Setting up Nabto is as easy as setting up the wifi. First of we need to get the necessary tools for getting the uNabto files and compiling for the Raspberry Pi. This is done by issuing the following commands one line at a time
sudo apt-get install git
sudo apt-get install cmake
git clone https://github.com/nabto/unabto.git
cd unabto/apps/raspberry_pi
cmake .
make
We now have Nabto compiled on our Pi! All that is left to do is to create a new device at the Nabto Cloud Console. Simply Add Device and copy the newly created Key
We now return to the Raspberry Pi and issue the following command for initiating the Nabto software
sudo ./unabto_raspberrypi -d "id".demo.nab.to -s -k "key"
You should see a couple of lines of output ending with
13:40:47:548 unabto_attach.c(575) State change from WAIT_GSP to ATTACHED
Which means Nabto is successfully up and running!
Trying out Nabto
Now that everything is up and running the final thing to do is to access id.demo.nab.to in your browser. You will be met with a log in page, simply click Guest, followed by an image like this
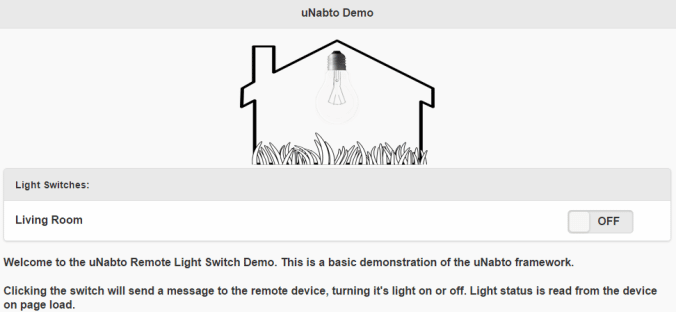
Sliding the switch to either side will now trigger the onboard activity light on your Raspberry Pi, check it out!
For a more in depth introduction on how to write your own functionality into the Nabto framework, please refer to this blog post The SunPi control center.