Note! The example in this post is using the deprecated uNabto platform. We recommend using Nabto Edge for all new designs – read more about Nabto Edge vs uNabto in general.
As ESP8266 is too resource constrained for using Nabto Edge, we recommend using ESP32 over ESP8266. See our Nabto Edge ESP32 examples.
The ESP8266 is a low-cost WiFi module that can be programmed directly like a microcontroller. Already thinking of your next Internet of Things project?
While an available Arduino library allows a quick start, there is still one problem to overcome: How to access your ESP8266 from outside your home network without nerve-racking router and firewall configurations or heavy cloud services? Running the uNabto server on your ESP8266, you can establish a fast and secure Peer-to-Peer connection using only a static ID – from everywhere, no matter what is in between.
What hardware you’ll need
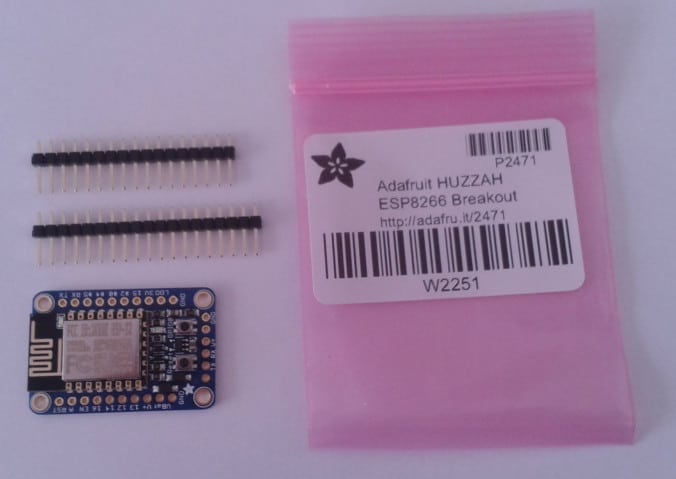 Adafruit HUZZAH ESP8266 Breakout
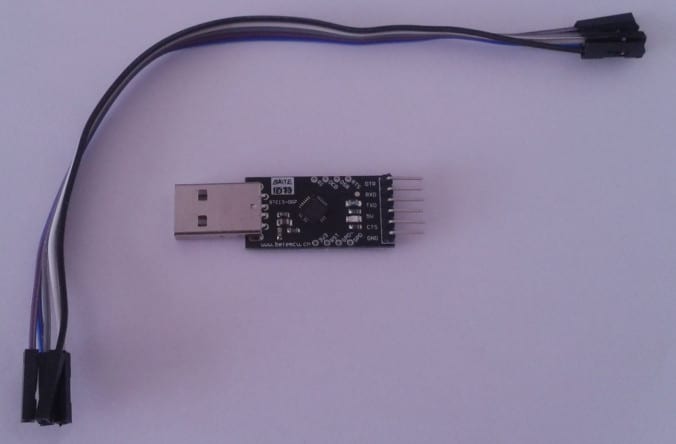 USB to TTL Serial Cable
This project is tested on an Adafruit ESP8266 board. It’s not the cheapest you can get, but very prototyping friendly. You can put it on a breadboard and it has a 3.3V voltage regulator onboard. Of course, you can also use a different ESP8266 module. Wikipedia provides an extensive list of available modules.
Regarding the USB to TTL Serial Cable (get it e.g. here), there are no special requirements when using the Adafruit module. If you use a different module, make sure the voltage levels match, since most boards only accept 3.3V.
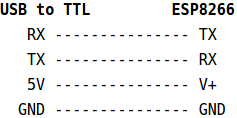
Solder the pin header to your ESP8266 board and connect it to your USB to TTL adapter using 4 wires:
What software you’ll need
This project is tested on Ubuntu 16.04 but should work on any OS supported by the Arduino IDE.
We want to program the ESP8266 directly, instead of using any higher level interpreters available for the module. Adafruit provides a nice tutorial on how to setup your Arduino IDE accordingly.
If everything is running, you should be able to compile the following simple sketch and upload it to your ESP8266. This will make the onboard LED blink every second.
const int led = BUILTIN_LED;

void setup() {
  pinMode(led, OUTPUT);
}

void loop() {
  digitalWrite(led, HIGH);
  delay(500);
  digitalWrite(led, LOW);
  delay(500);
}
How the Nabto platform works
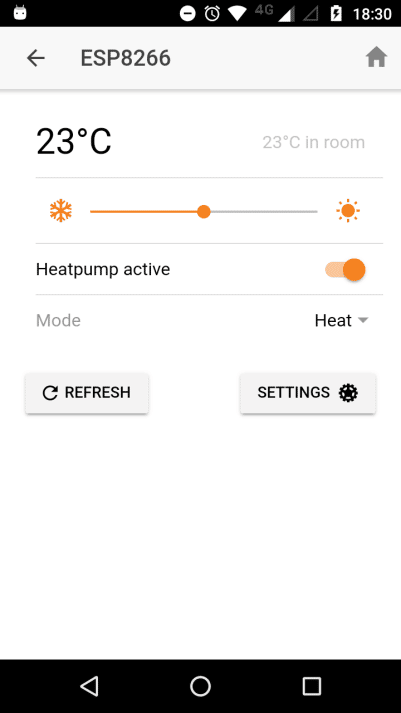
So far, so good. But how does the Nabto platform actually work? The drawing below gives a brief overview. Your ESP8266 module represents the Device running the uNabto server. As soon as it connects to the internet it identifies itself at the Nabto Basestation, using its unique ID. If a Client wants to connect to the ESP8266, a connect request with the ID is sent to the Basestation, and a direct connection to the device is established. A client can be a native app or use an abstraction framework like our Heat Control Ionic starter app used in this demo.
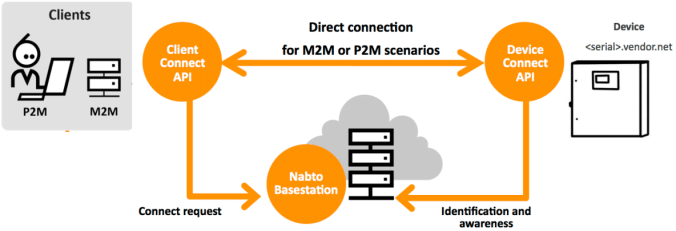
Get more information on the Nabto Cloud Console platform and the Client/Device SDKs on console.cloud.nabto.com.
The uNabto Platform Adapter
The uNabto server is divided into two layers:
- The actual uNabto framework (uNabto SDK)
- The uNabto Platform Adapter abstraction layer between the framework and the Native Platform
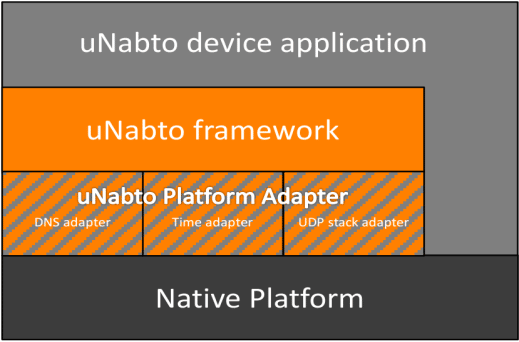
Hence, we only need to implement the uNabto Platform Adapter, in order to port the uNabto server to the ESP8266 module.
Implementing the Platform Adapter
The Platform Adapter acts as link between the generic uNabto framework and the Arduino platform, including the ESP8266 WiFi library. The adapter is divided into single files, as suggested in the Nabto documentation (TEN023 Nabto device SDK guide, section 12):
- unabto_config.h: Basic uNabto configuration
- unabto_platform_types.h: Define all necessary uNabto types
- unabto_platform.h: Platform specific ad-hoc functions
- network_adapter.cpp: Init, close, read and write functionality for network data
- time_adapter.cpp: Time functions
- dns_adapter.cpp: DNS resolving
- random_adapter.cpp: Random generator
- log.cpp: Logging
If you are interested in how the platform adapter is implemented in detail, check the adapter files in the src directory of the library on GitHub.
Using the Library
Get the Nabto ESP8266 Arduino library from https://github.com/nabto/unabto-esp8266-sdk and follow the installation instructions.
An example sketch can be found in
File -> Examples -> Nabto-ESP8266 -> HeatPump
The sample sketch includes the Nabto class, which encapsulates the Nabto setup. First, some settings are made. This includes the WiFi SSID and password, followed by the unique Device ID and preshared key of the device obtained from console.cloud.nabto.com
// Enter ssid and password of your WiFi network
const char* WIFI_SSID = "<SSID>";
const char* WIFI_PASSWORD = "<PASSWORD>";

// Enter device id and pre-shared key from <a href="https://console.cloud.nabto.com/#/signup">console.cloud.nabto.com</a>
const char* DEVICE_ID = "<DEVICE ID>";
const char* PRE_SHARED_KEY = "<PRE-SHARED KEY>";
The setup function is used to init the LED pin, the Serial module, and connect to the WiFi. In line 91 you can see how the Nabto module is initialised. After the Nabto version is printed our heatpump demo is initialized.
void setup() {
    // Initialize Serial
    Serial.begin(115200);

    // Wait 2s for button press to do factory reset
    pinMode(0, INPUT_PULLUP);
    bool factory_reset = false;
    while(millis() < 2000) {
      if(digitalRead(0) == LOW) {
        Serial.println("FACTORY RESET");
        factory_reset = true;
        break;
      }
    }

    // Initialize built-in led
    pinMode(LED_PIN, OUTPUT);
    analogWrite(LED_PIN, PWMRANGE);

    // Initialize WiFi
    WiFi.begin(WIFI_SSID, WIFI_PASSWORD);
    Serial.print("Connecting to WiFi..");
    while (WiFi.status() != WL_CONNECTED) {
        Serial.print(".");
        delay(500);
    }
    Serial.println("done");

    // Initialize Nabto
    Serial.println("Init Nabto...");
    Nabto.begin(DEVICE_ID, PRE_SHARED_KEY);

    // Print Nabto version
    char versionString[10];
    Nabto.version(versionString);
    Serial.print("Nabto v");
    Serial.print(versionString);
    Serial.println(" running");

    // Initialize demo application
    demo_init(factory_reset);
    demo_application_set_device_name("ESP8266");
    demo_application_set_device_product("ACME 9002 Heatpump");
    demo_application_set_device_icon_("img/chip-small.png");
}
The only thing that needs to be done in the loop function is to call the tick() method of the Nabto class. This triggers the framework to check for new UDP packets and send responses. The time between ticks should be around 10 milliseconds. This is achieved by a hard delay, but you can also use the time to do application related stuff. For example, we use it to update the brightness of the LED and to simulate the room temperature in the demo application tick function.
void loop() {
    Nabto.tick();
    demo_application_tick();
    delay(10);
}
The actual handling of received Nabto messages from the client is implemented in the application_event(..) function. The handler uses the interface definition shared with the client.
pplication_event_result application_event(application_request* request,
                                           unabto_query_request* query_request,
                                           unabto_query_response* query_response) {

    //NABTO_LOG_INFO(("Nabto application_event: %u", request->queryId));
    //debug_dump_acl();

    // handle requests as defined in interface definition shared with
    // client - for the default demo, see
    // https://github.com/nabto/ionic-starter-nabto/blob/master/www/nabto/unabto_queries.xml

    application_event_result res;

    switch (request->queryId) {
    case 10000:
        // get_public_device_info.json
        if (!Nabto.write_string(query_response, device_name_)) return AER_REQ_RSP_TOO_LARGE;
        if (!Nabto.write_string(query_response, device_product_)) return AER_REQ_RSP_TOO_LARGE;
        if (!Nabto.write_string(query_response, device_icon_)) return AER_REQ_RSP_TOO_LARGE;
        if (!unabto_query_write_uint8(query_response, fp_acl_is_pair_allowed(request))) return AER_REQ_RSP_TOO_LARGE;
        if (!unabto_query_write_uint8(query_response, fp_acl_is_user_paired(request))) return AER_REQ_RSP_TOO_LARGE;
        if (!unabto_query_write_uint8(query_response, fp_acl_is_user_owner(request))) return AER_REQ_RSP_TOO_LARGE;
        return AER_REQ_RESPONSE_READY;

    case 10010:
        // set_device_info.json
        if (!fp_acl_is_request_allowed(request, REQUIRES_OWNER)) return AER_REQ_NO_ACCESS;
        res = Nabto.copy_string(query_request, device_name_, sizeof(device_name_));
        if (res != AER_REQ_RESPONSE_READY) return res;
        if (!Nabto.write_string(query_response, device_name_)) return AER_REQ_RSP_TOO_LARGE;
        return AER_REQ_RESPONSE_READY;

    case 11000:
        // get_users.json
        return fp_acl_ae_users_get(request, query_request, query_response); // implied admin priv check

        // [...]
    }
}
Test your device
After compiling and uploading your HeatPump sketch to the ESP8266, it establishes a connection to your WiFi network and starts the uNabto server. In your serial monitor you should see the following printout:
Connecting to WiFi........done
Init Nabto...
Device id: 'n7j4qebq.hyr7o.trial.nabto.net'
Program Release 123.456
Application event framework using SYNC model
SECURE ATTACH: 1, DATA: 1
NONCE_SIZE: 32, CLEAR_TEXT: 0
Nabto was successfully initialized
Nabto v123.456 running
SECURE ATTACH: 1, DATA: 1
NONCE_SIZE: 32, CLEAR_TEXT: 0
State change from IDLE to WAIT_DNS
Resolving dns: esp8266test1.demo.nab.to
State change from WAIT_DNS to WAIT_BS
State change from WAIT_BS to WAIT_GSP
########    U_INVITE with LARGE nonce sent, version: - URL: -
State change from WAIT_GSP to ATTACHED
Now, connect to your device using the Heat Control Ionic starter app and see the LED change its brightness according to the target heat.