
Important notice: This post is about the legacy Nabto 4/Micro platform which has been superseded by the Nabto 5/Edge platform. Also see the general comparison of Nabto 4/Micro (uNabto) and Nabto 5/Edge.
Please read Part 1 to read about the preliminary steps in the Roomba saga.
This part will be the fun part where we turn the Roomba into a fully fledged remote controlled vehicle fitted with realtime video feed as well!
If at any time you feel like trying this yourself, you can sign up for a free developer account or/and read more here.
In details, this part will be dealing with
- Turn the Roomba into a remote controlled car
- Add soundeffects
- Add sensor data
- Add video streaming
The RC Roomba
Turning the Roomba into a remote controlled car is really easy once the groundwork is done correctly (see Part 1).
All we need are the new opcodes given to us in the documentation:
- Drive straight (20 cm/s)
- Using W
- {137, 0, 255, 128, 0}
- Reverse (20 cm/s)
- Using S
- {137, 255, 0, 128, 0}
- Rotate counterclockwise
- Using A
- {137, 0, 255, 0, 1}
- Rotate clockwise
- Using D
- {137, 0, 255, 255, 255}
This is all we need on the device side of things. For the html part I simply chose to create a text input field which detects when a certain character is pressed in accordance with the keys given above. Say, for example, that you press W. The Roomba will now drive in a straight line until the user sends a new command. If a key is pressed which does not have a predefined action, then the Roomba will stop driving. I usually use space to stop.
Adding sound effects
It is possible to store melodies in the Roomba. On our specific model, 581, we can store 4 melodies with 16 notes each (that storage!). From the documentation we find the serial sequence to be
[140] [Song Number] [Song Length] [Note Number 1] [Note Duration 1] [Note Number 2] [Note Duration 2].etc.
I decided to add a reverse sound, the DSB sound and a Dixie Horn style, River Kwai March (warning: loud) sound. These were added with the following codes
- Reverse sound
- {140, 1, 6, 84, 32, 30, 32, 84, 32, 30, 32, 84, 32, 30, 32}
- DSB sound
- {140, 0, 3, 74, 40, 75, 20, 70, 32}
- Dixie Horn sound
- {140, 3, 12, 86,10, 83,10, 79,10, 79,10, 79,10, 81,10, 83,10, 84,10, 86,10, 86,10, 86,10, 83,10}
The songs can then be played back by this sequence [141][Song Number], like this
- Reverse sound
- Played when the Roomba goes in reverse
- {141, 3}
- DSB - Using K - {141, 0}
- Dixie Horn
- Using L
- {141, 3}
Sensor data
The Roomba has 58 different sensor data packets, which all return hex values. For this I want to query
- Battery temperature
- Packet ID 24
- Data bytes: 1, signed.
- Returns the temperature of the Roomba’s battery in degrees Celsius.
- Battery charge
- Packet ID 25
- Data bytes: 2, unsigned
- Returns the charge level in mAh
- Battery capacity
- Packet ID 26
- Data bytes: 2, unsigned
- Returns battery capacity in mAh
- Charging state
- Packet ID 34
- Data bytes: 1, unsigned
- Returns 1 if charging, 0 otherwise
We can query all these with a single sequence
[149][Number of Packets][Packet ID 1][Packet ID 2]...[Packet ID N]
which look likes this in our case
{149, 4, 24, 25, 26, 34}
Referencing the above Data bytes gives us a total sensor byte size of 6 bytes. The battery temp and charging state can be taken directly, since they only have 1 data byte. Charge and capacity need some attention since we need to bitwise left shift on the high (first) byte before we can get a decimal number. In C this is done like so
Number = [1]<<8 | [2]
We then calculate the battery level by simply doing
bat_level = 100 * (charge/capacity)
I then created a button for our html code which output charging state, battery level and battery temperature, when pressed.
Video streaming through Nabto tunnel
For this we selected to use a Raspberry Pi Camera Module since we already had one at the office. I then read about various ways of streaming the output and display it on a webserver. I tried many different approaches but eventually settled on RPi Cam Web Interface since it gave the best compromise between low latency, low bandwith usage and “high” resolution. Furthermore, these settings are fully costumisable and the user can thus change values for their needs. An extra feature is the ability to run motion detection and to take 2592 x 1944 pixel static images or 1080p @ 30fps, 720p @ 60fps and 640x480p 60/90 video recording.
Setting up a webserver on our Pi
To get the video webserver up and running on our Pi is fairly easy when following the instructions laid out here.
sudo apt-get update
sudo apt-get dist-upgrade
git clone https://github.com/silvanmelchior/RPi_Cam_Web_Interface.git
cd RPi_Cam_Web_Interface
chmod u+x *.sh
./install.sh
The installation prompt will have some adjustable settings such as whether to run an apache or nginx webserver. Choose whatever you prefer. I chose to change the default port from 80 to 90 to avoid conflict with any other service running on our Pi. After installation a webserver should now be running. We can access it on our local network by going to pi_ip:port_chosen/html
If no video is running, try issuing ./start.sh or do an update by ./update.sh.
The default settings worked very well for me but if you happen to have a very low bandwith internet connection (or running this on one of the earlier Pi versions) you can try to adjust the bandwith settings.
Tunneling
To make our video feed available from anywhere, we will be running a Nabto tunnel on our Pi as well. Compiling a Nabto tunnel is very easy, simple issue these commands one line at a time on the Pi
cd unabto/apps/tunnel cmake . make
which we can execute by doing
./unabto_tunnel -d "id".demo.nab.to -s -k "key"
where the id and key are generated at console.cloud.nabto.com
Finally we need to run the other end of the tunnel on our client machine. I will present how to do this using our simpleclient_app solution which works on Linux, Windows and Mac OSX. Furthermore I will walk through how to use the special Tunnel manager tool for Windows. All this can be downloaded from console.cloud.nabto.com where we also need the common Nabto Client SDK Resources.
Command line
On our client machine, combine the Simple Client and Client SDK Resources such that the structure look like this
./bin/simpleclient_app and ./share/nabto/users/guest.crt and then issue
./simpleclient_app -q "id".demo.nab.to --tunnel client_port:localhost:device_port
which should output a few lines ending with either
tunnelStatus LOCAL
or
tunnelStatus REMOTE_P2P
depending on if the connection to the Pi is local or remote.
Tunnel Manager for Windows
Grab a copy of Tunnel Manager and input
"id".demo.nab.to into "Server"
127.0.0.1:client_port into "Local endpoint"
127.0.0.1:device_port into "Remote endpoint"
Which can look something like this
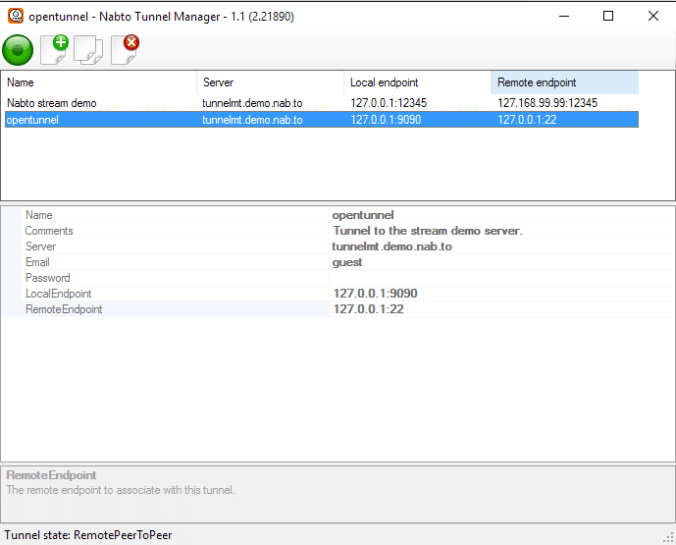
The tunnel is now up and running on the Pi and we are connected to from the client.
Let’s have some fun!
Everything is now setup. On our device side we are running a Roomba remote ./unabto_raspberry and a ./unabto_tunnel.
On the client side we are either running no tunnel (if we do not need video streaming) or either a command line ./simpleclient_app or the Tunnel Manager for Windows.
We can now finally access our uNabto Roomba webpage as we did in Part 1 where we will be greeted with this.
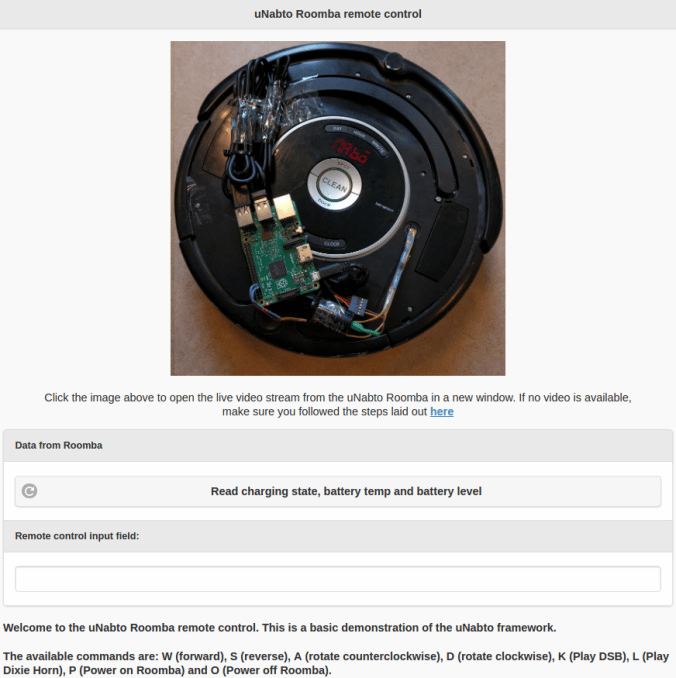
As stated below the image, clicking it will open a new window showing us the tunneled stream from the webserver running on the Pi. Just below the image is a button for reading sensor data and below that I placed the input field for controlling the uNabto Roomba.
All that is left is to test it out!
If you feel like doing the same thing, please feel free to check out the code on Github and sign up for a developer account at the Nabto Cloud Console, it is all free and you can create and manage 10 devices. This is also where you can find the SDKs and other Nabto software!