
Important notice: This post is about the legacy Nabto 4/Micro platform which has been superseded by the Nabto 5/Edge platform. Also see the general comparison of Nabto 4/Micro (uNabto) and Nabto 5/Edge.
As some of you might have seen on twitter we had a device laying around at the Nabto headquarters with Nabto written all over it.
Today is the grand reveal of our Roomba hack!
Like the CoffeePi this project was rather substantial so the Roomba hack will be split in two parts.
In this part we will be dealing with a common use case, namely to start a clean cycle remotely. For this we will go through
- Hardware hacking and wiring
- Adding the Nabto framework
Part 2 will deal with the fun stuff
- Turn the Roomba into a remote controlled car
- Add soundeffects
- Add sensor data
- Add video streaming
Hardware hacking and wiring
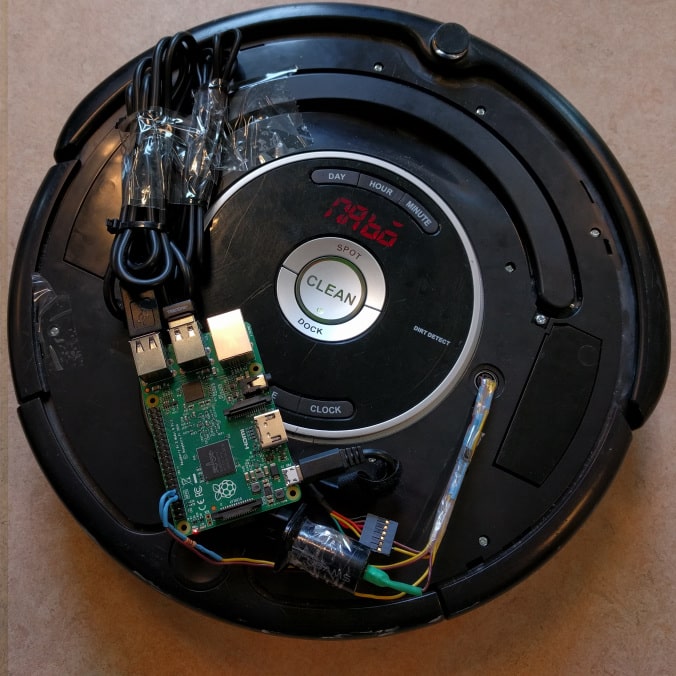
Roombas manufactured after October 2005, have a Serial Command Interface (SCI) for which some great documentation (here and here) is given by the company itself. Reading these revealed that everything on the Roomba is configurable through this interface and it is indeed awesome that the company itself encourages the hacking community. So why not get some Nabto running on our Roomba? The model we have is a 5xx series. For our specific model, 581, the serial port was hidden underneath a plastic shroud which we tore right off. Underneath we locate the 7 pin SCI which look like this (from the documentation)
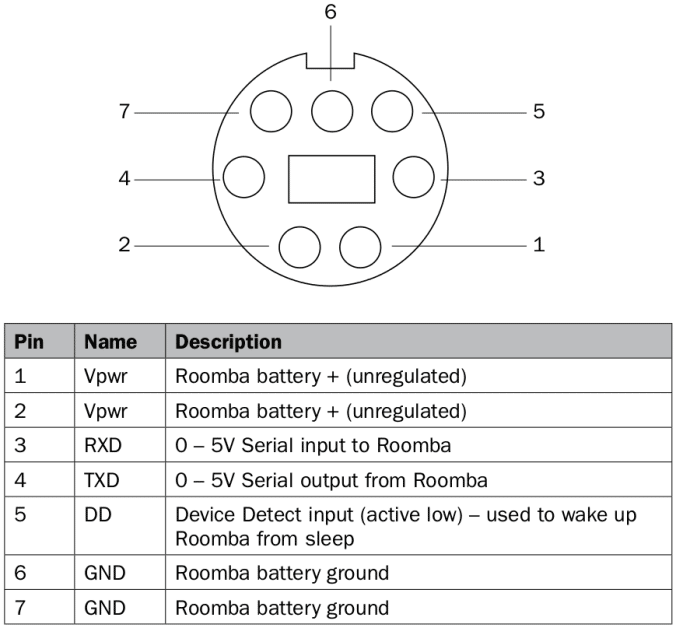
We will be using pin 3, 4, 5 and 6 for communication. For this, we settled on using a 5V (!) USB serial cable. If you plan on using a 3.3V serial cable, you will need a logic level converter.
Furthermore, we want the Roomba to truly be standalone so we need some way of converting the unregulated battery voltage of 14.4 V to 5V. My simple, cheap go to solution for situations like this is an USB car charger which can be had for around 1$. They are built for variable voltage inputs of everything from 12V to 24V so they will work just fine for our Roomba project.
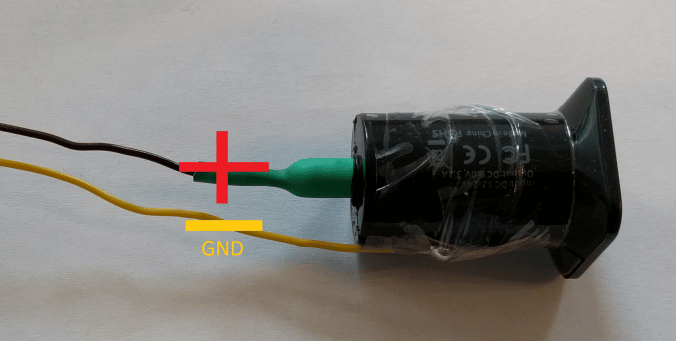
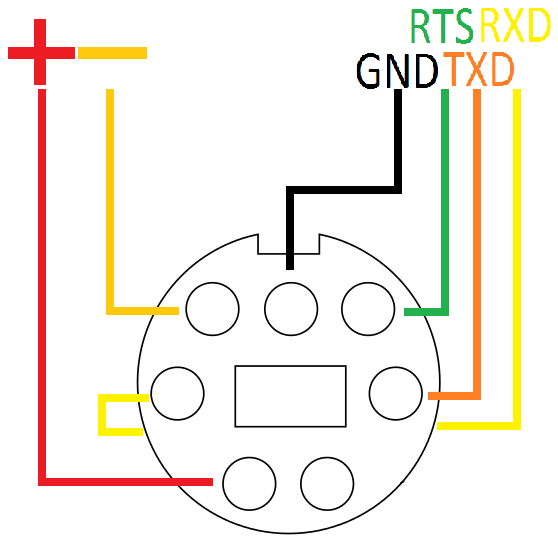
We then fit the + wire of our USB car charger to pin 1 or 2 on the Roomba and the + wire to pin 7 on the Roomba, for ground. In total, our wiring should look like this
Adding the Nabto framework
To use the USB serial cable I wrote some small helper functions, which we will use for waking, initialising and writing/reading to/from the Roomba.
First, we need to initialise our serial connection (which we only need to do once)
char *portname = "/dev/ttyUSB0";

fd = open (portname, O_RDWR | O_NOCTTY | O_SYNC);
if (fd < 0)
{
    NABTO_LOG_INFO(("error %d opening %s: %sn", errno, portname, strerror (errno)));
    return 0;
}
else{
    NABTO_LOG_INFO(("Opening %s: %sn", portname, strerror (errno)));
}

    set_interface_attribs (fd, B115200, 0);  // set speed to 115,200 bps, 8n1 (no parity)
    set_blocking (fd, 0);                // set no blocking
We continue by waking up the Roomba from sleep which we do by setting the Device Detect (DD) low for say, 100ms, (as stated in the documentation). This is done by controlling the RTS line of our serial.
// Wake Roomba
setRTS(fd, 0);
usleep(100000); //0.1 sec
setRTS(fd, 1);
sleep(2);
The Roomba is then ready for commands! The code for inputting a virtual clean button press is
// Start clean cycle
char clean[] = {135};
write(fd, &clean, sizeof(clean));
usleep ((sizeof(clean)+25) * 100);
The actual command, or opcode, is 135, taken from the documentation. To stop the cleaning process, we can either issue the clean command again or put the Roomba into sleep mode. To avoid ambiguity when sending commands, I chose the latter, which has the opcode 133.
For now, this is all we need but we will explore many more (much more fun) commands in part 2 (we will update with a link here when posted).
Since we have written the helper functions in pure C, this code can be compiled for multiple devices. I tested it on my laptop running Linux Mint 17.3 Cinnamon 64-bit and on a Raspberry Pi 2 running Raspbian Jessie. It should compile just fine on at least all versions of Raspberry Pi and possibly anything else running Linux with the required libraries.
For our standalone Roomba, we of course settled on using the Pi, which we first set up for wireless network access (check an easy howto here) followed by getting the uNabto files and compiling for the Raspberry Pi. This is done by issuing the following commands one line at a time
sudo apt-get install git
sudo apt-get install cmake
git clone https://github.com/MarcusTherkildsen/unabto
cd unabto/apps/raspberry_pi_roomba
cmake .
make
We now have uNabto compiled on our Pi! All that is left to do is to create a new device at developer.nabto.com. Simply Add Device and copy the newly created Key
We now return to the Raspberry Pi and issue the following command for initiating the Nabto software
sudo ./unabto_raspberrypi -d "id".demo.nab.to -s -k "key"
You should see a couple of lines of output ending with
13:40:47:548 unabto_attach.c(575) State change from WAIT_GSP to ATTACHED
Which means uNabto is successfully up and running! That’s all, we can now remotely start a cleaning cycle and stop it again by opening a browser and access id.demo.nab.to in your browser. You will be met with a log in page, simply click Guest, followed by an image like this
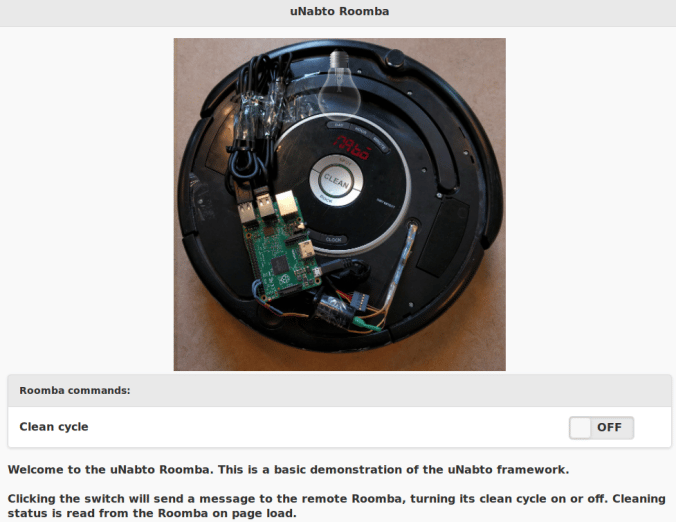
Sliding the switch to either side will now trigger the clean cycle on our Roomba, check it out!
If you suddenly got the urge to create your own IoT device using Nabto feel free to check out our other blogs or sign up for a developer account at console.cloud.nabto.com, it is all free and you can create and manage up to 10 devices. This is also where you can find the SDKs and other Nabto software!
The full code for this simple Roomba uNabto hack can be found at github.
Stay tuned for part 2 where we’ll have some fun!