
Important notice: This post is about access control in the legacy Nabto 4/Micro platform. For modern access control in Nabto 5/Edge, see the intro to security in Nabto Edge. Also see the general comparison of Nabto 4/Micro (uNabto) and Nabto 5/Edge.
This blog post is the first of two that describe all the steps necessary to implement a paired public key authentication (PPKA) based Nabto solution. This first part introduces concepts, explains how access control works in Nabto and dives into the details of implementing the uNabto device side of access control. Device in this context means the embedded (IoT) system. Part two describes the client side of things with implementation details for a few different platforms.
PPKA is the recommended approach to access control as outlined in section 8.2 of TEN036 Security in Nabto Solutions.
To recap, PPKA gives several benefits:
- simple solution with no dependency on a central user management solution or CA service
- strong security
- intuitive user experience with no need to sign up for a central service or issue certificates from a CA
Whether this is the right solution for you or not is discussed in section 8 of TEN036 Security in Nabto Solutions. If you don’t already have an existing central infrastructure for managing users (some kind of management portal) or an existing credentials database on the device, then this simple PPKA approach as described here is often ideal. The PPKA approach also supports more advanced use cases with centralized management of access control, this will not be covered in these posts.
Customization of the flow and rules is simple to do as the Nabto framework just provides the basic primitives to perform the pairing: The developer can get information about the user’s connection type and access a simple database of public keys (that is, fingerprints (checksums) of public keys) and the associated permissions.
How it Works
Nabto PPKA access control through the device’s access control list (ACL) is very similar to access control in SSH: The Nabto device ACL is similar to the authorized_keys file on SSH servers: Only clients that possess a keypair with a public key signature (fingerprint) in the authorized_keys file / ACL is allowed access.
The Nabto PPKA pairing flow is as follows:
- user creates an RSA keypair on a client device and associates it with a name, e.g. “Joe’s iPhone 8”
- in a trusted setting (similar to WPS for wifi configuration), the target IoT device is put into “open for local pairing” mode, e.g. at the first boot
- the user connects to the device on the local network while the device is in pairing mode
- the user’s public key is registered as the owner on the device through the device’s access control list
The user is now paired with the device. He can open for pairing again later on to add other users as guests. Or “manually” add other users’ public keys to the device’s access control list. “Manually” means updating the ACL database through other means, not assisted by the uNabto framework to extract the public key fingerprint. For instance, the owner (admin) can scan a QR code on the guest’s phone to read the guest’s public key fingerprint and pass this onto the device if the guest does not have LAN access. Or the device can have specific public key fingerprints pre-installed at the factory for allowing access from certain system users.
After pairing, the user can access the device from remote. When connecting from remote, the Nabto servers (denoted the basestation services) first perform a normal challenge response handshake with the client (as regular TLS) and hence validates that the client possesses the private key that matches the public key (the authentication step). The fingerprint of this public key is then passed on to the device which finally looks it up in its access control list (the authorization step): Does this client have access and what are the permissions?
The fingerprint is sent from basestation to device on the encrypted channel between the two, established when the device initially registers. For details, on this latter step, see section 9.1 in TEN036 Security in Nabto Solutions. For details on the full handshake, see sections 11.1 and 11.2 in TEN036. Essentially, the expensive RSA calculations are offloaded from the resource constrained device to the basestation so the device only needs to do less expensive symmetric cryptographic operations.
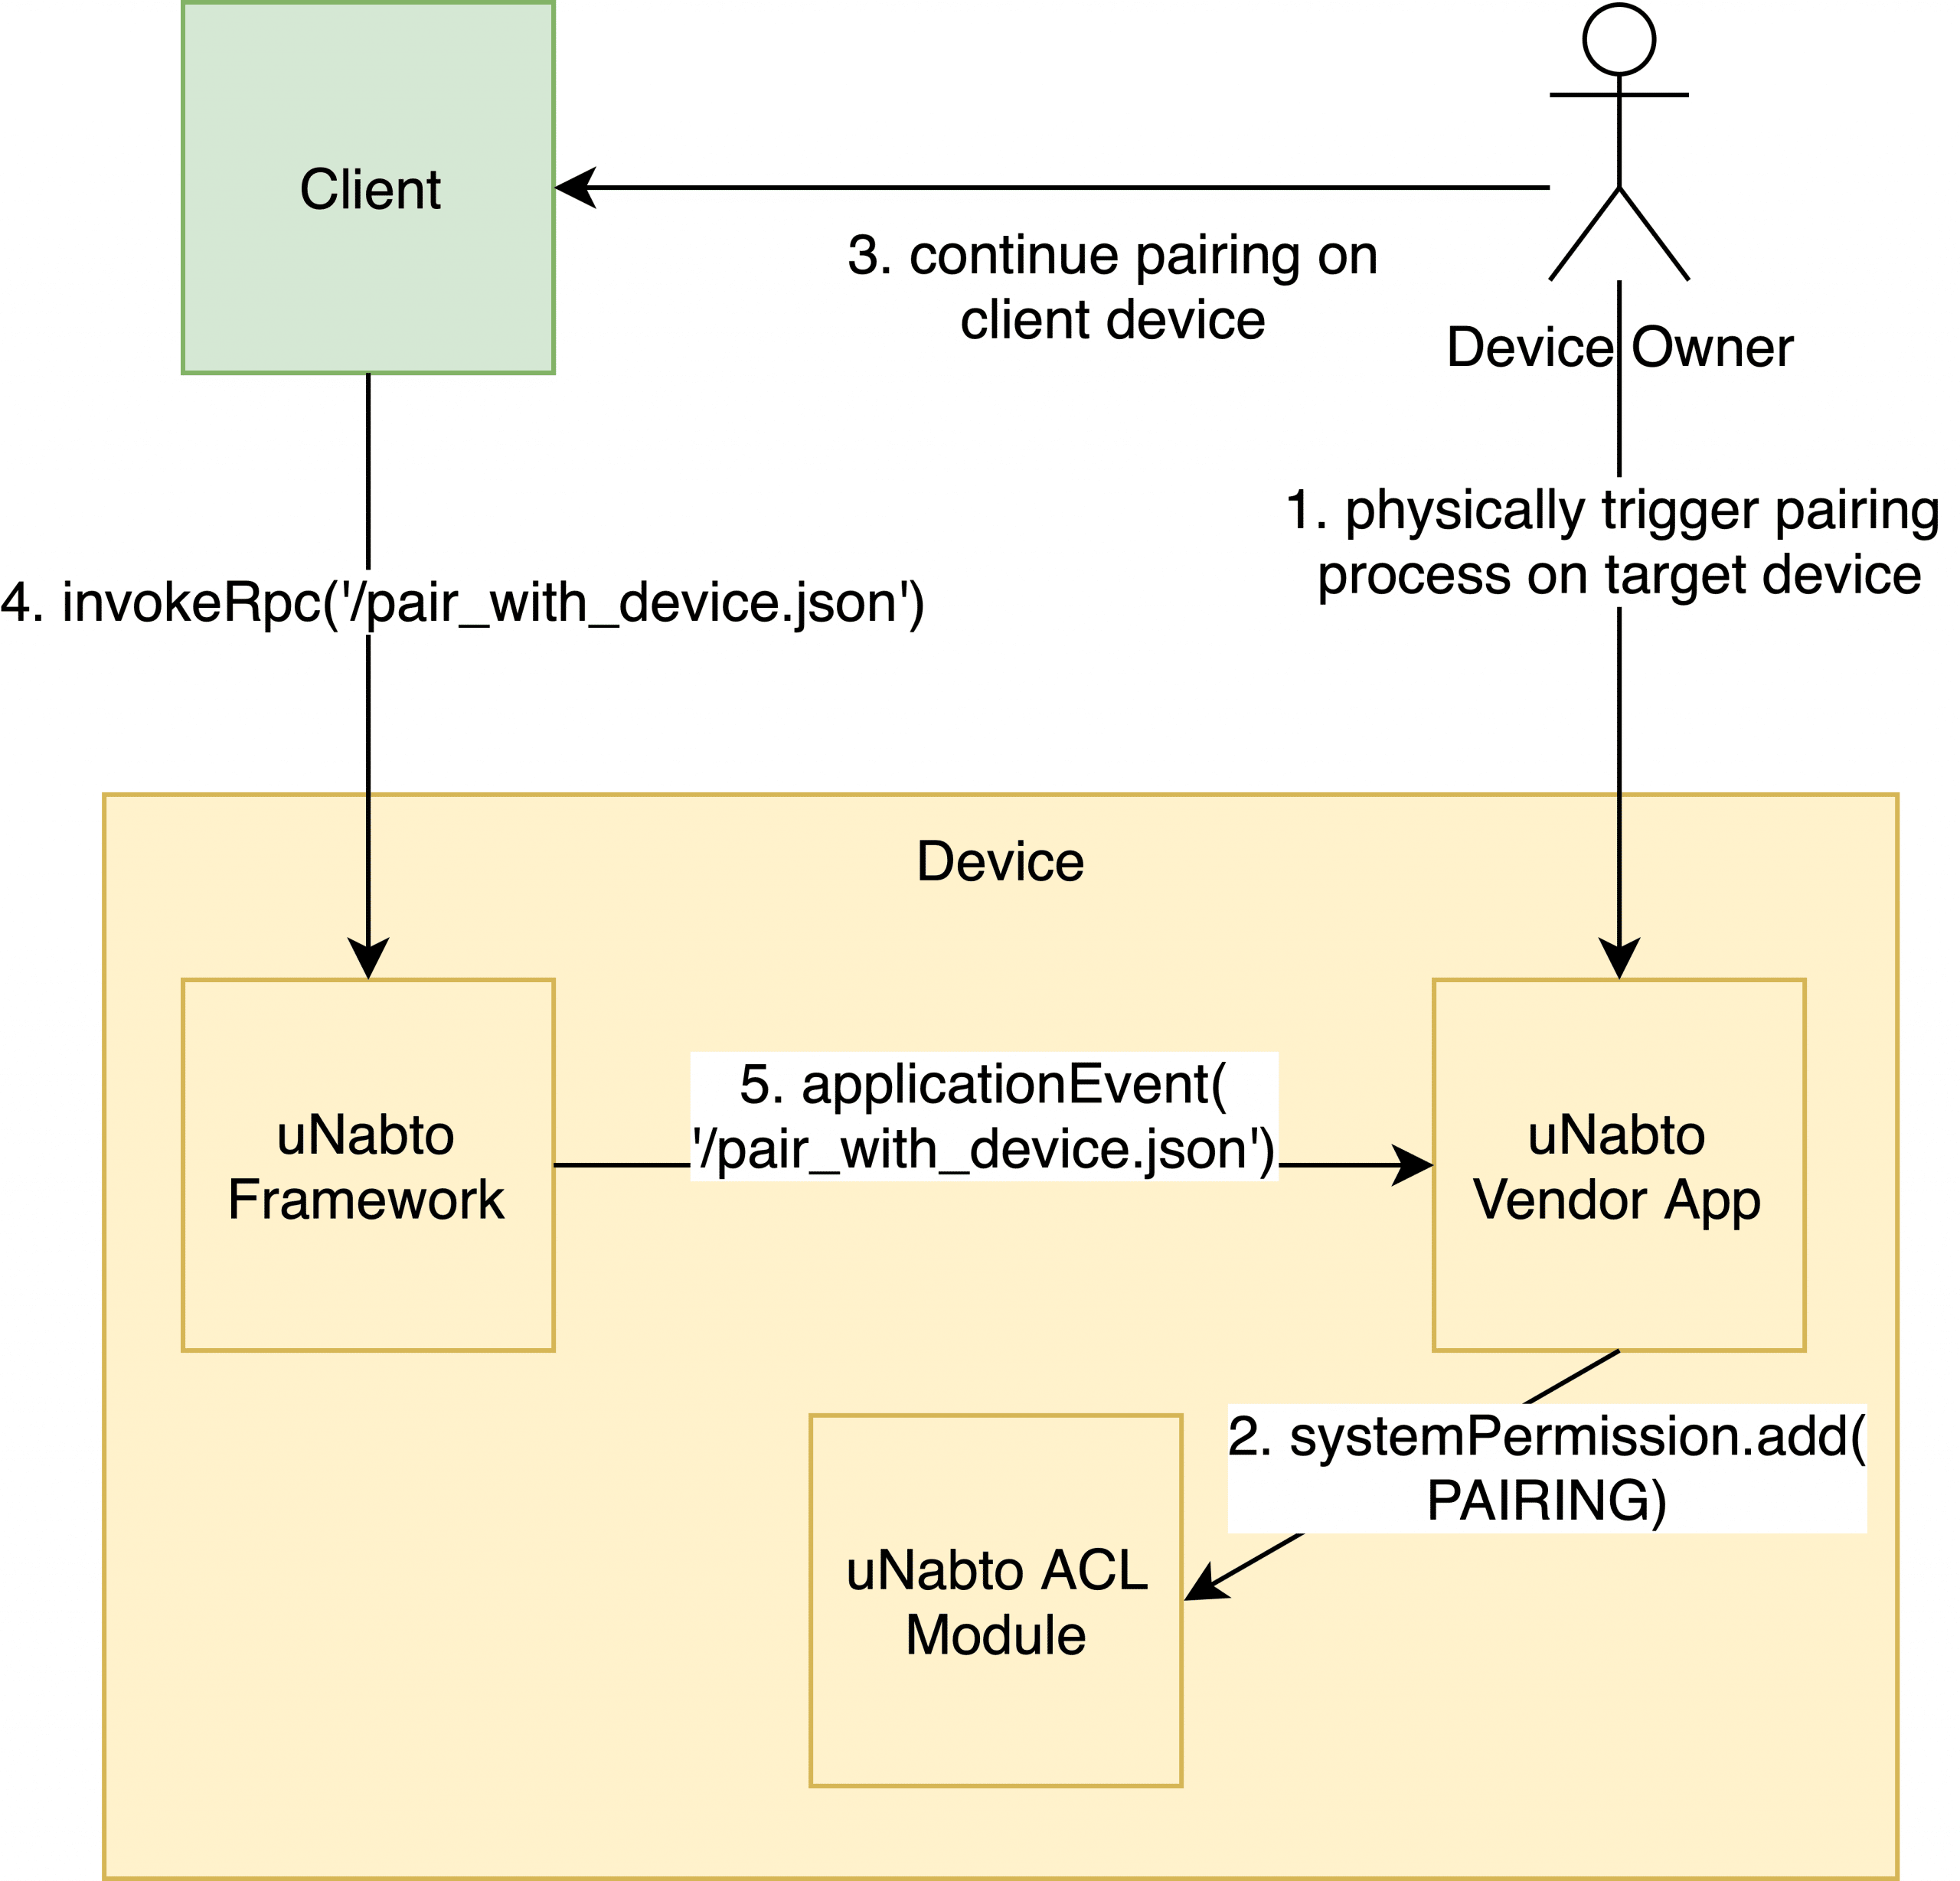
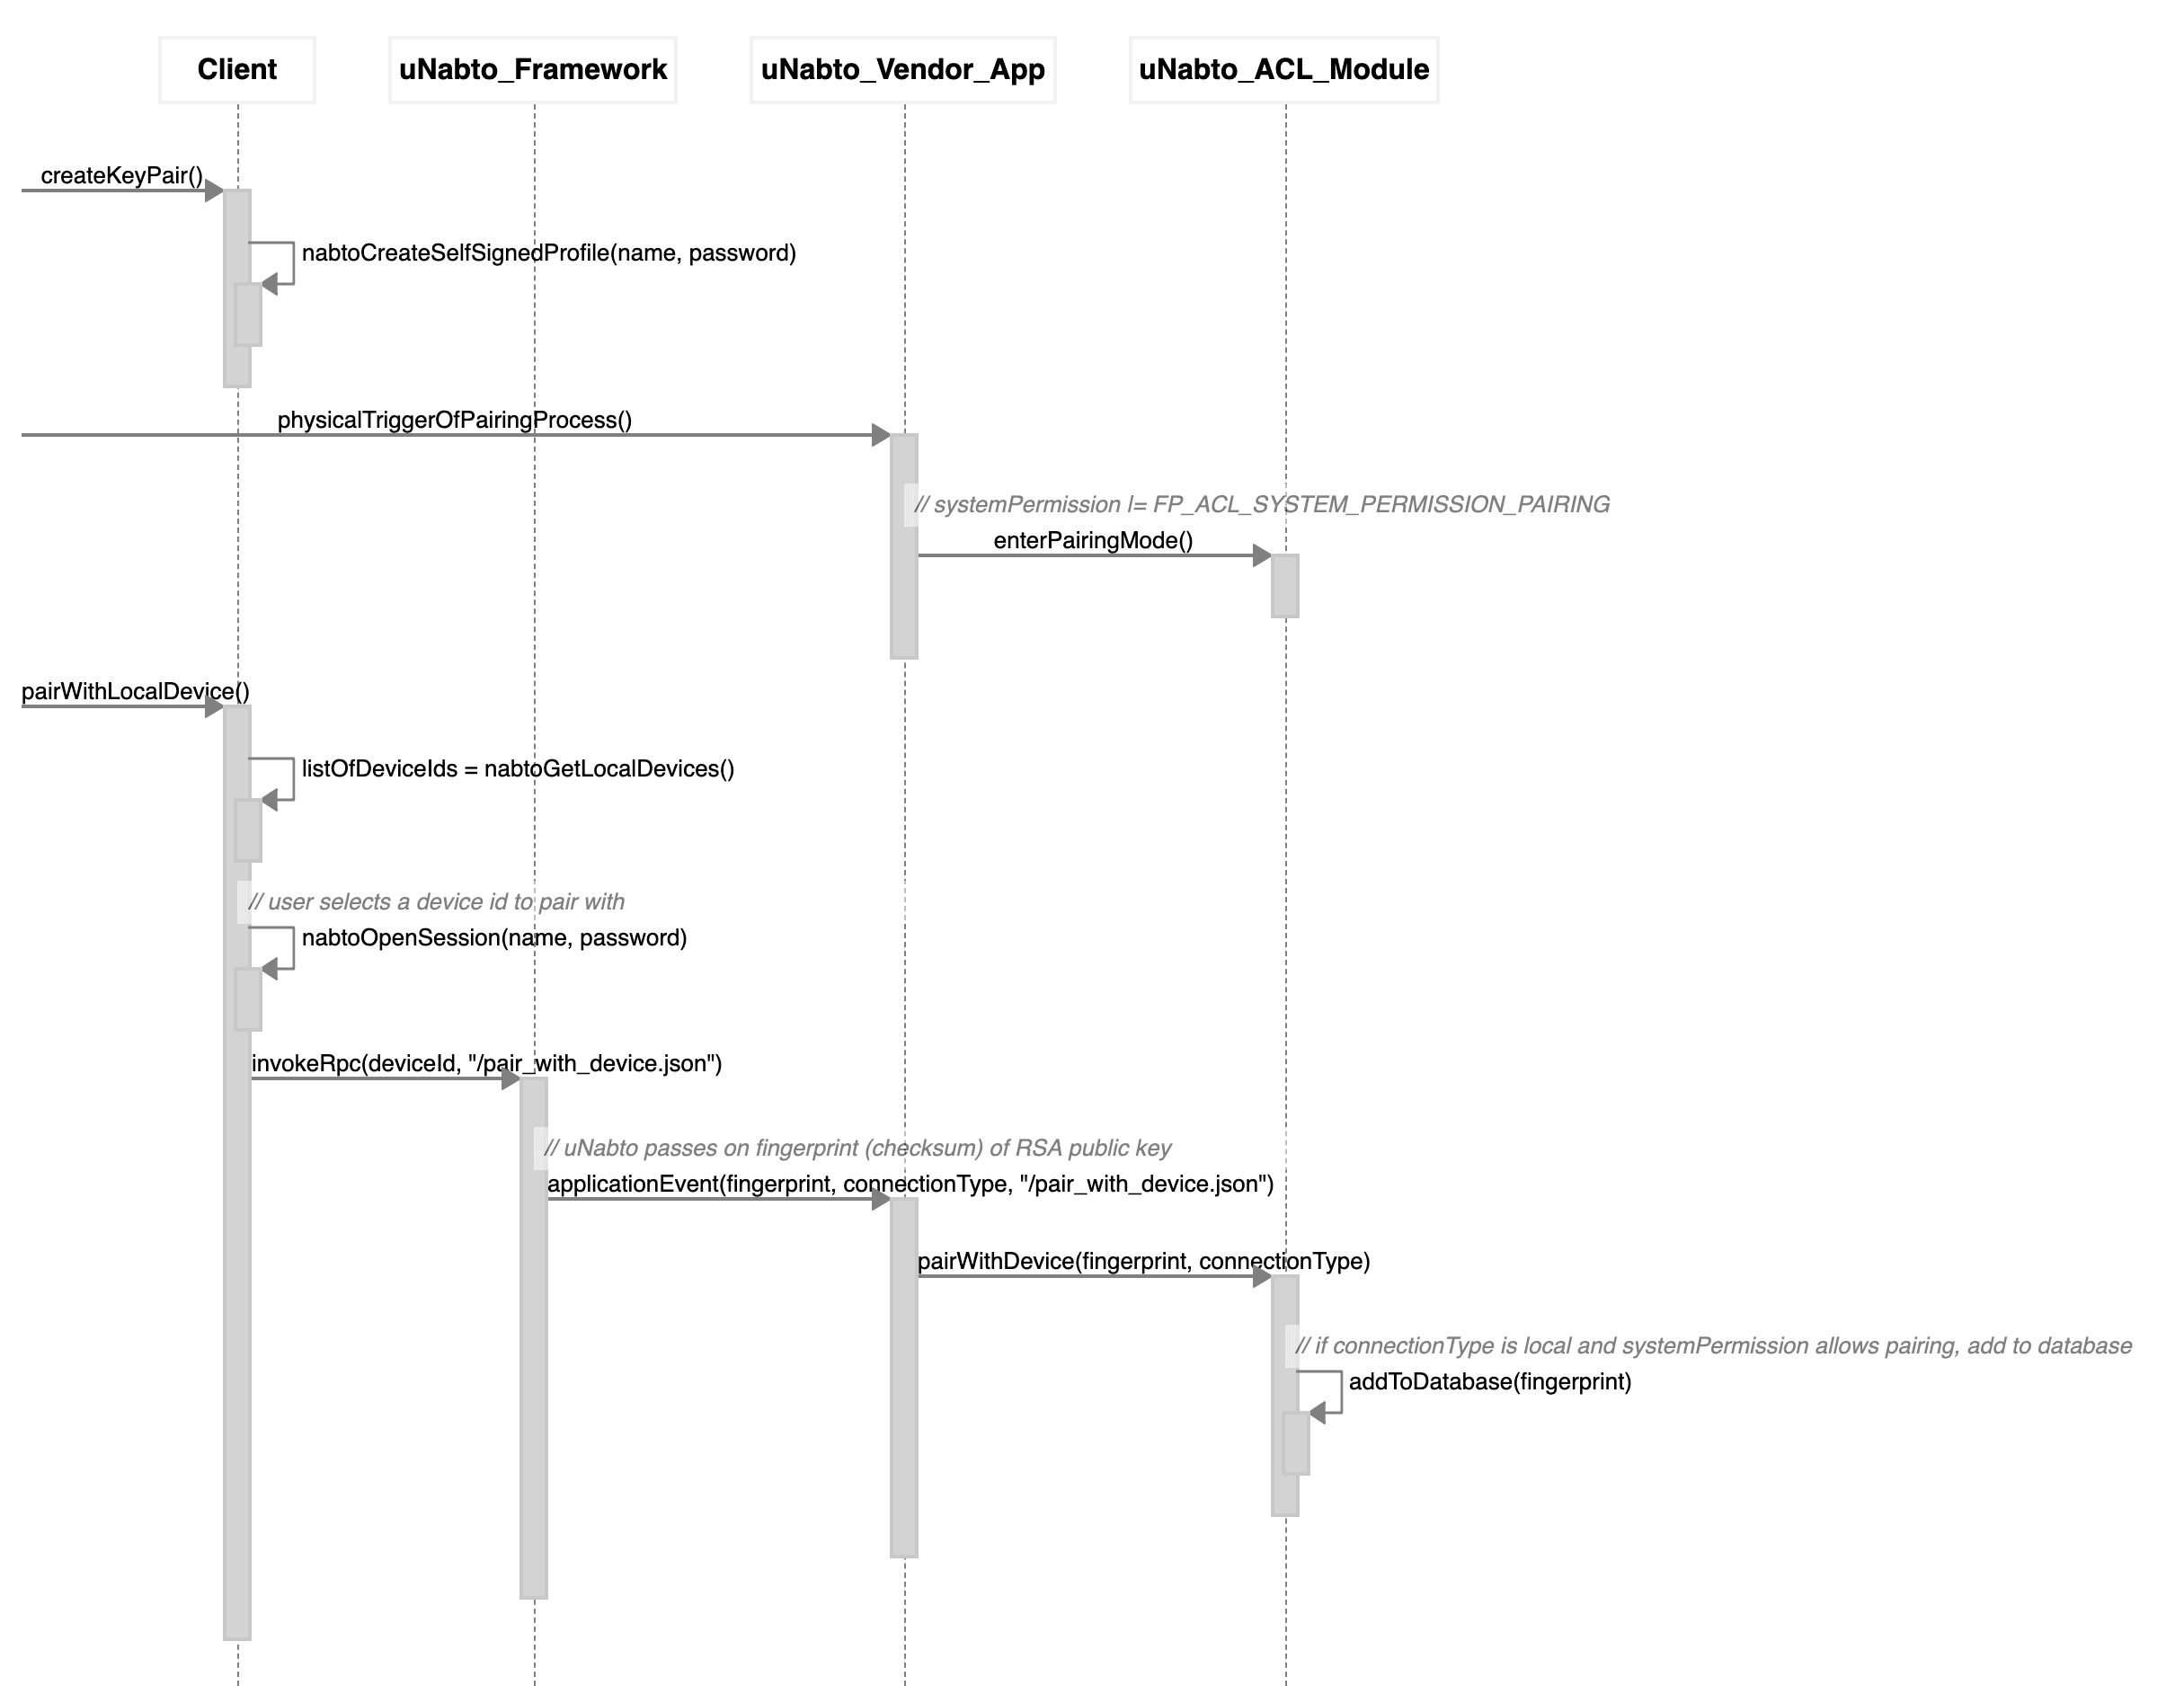
Schematically, the pairing looks as follows (starting when the user triggers the pairing process (assuming the RSA keypair already exists):
With a bit more detail, the pairing process looks as follows (“Vendor Backend” is the actual system to be remote controlled, e.g. a heating pump):
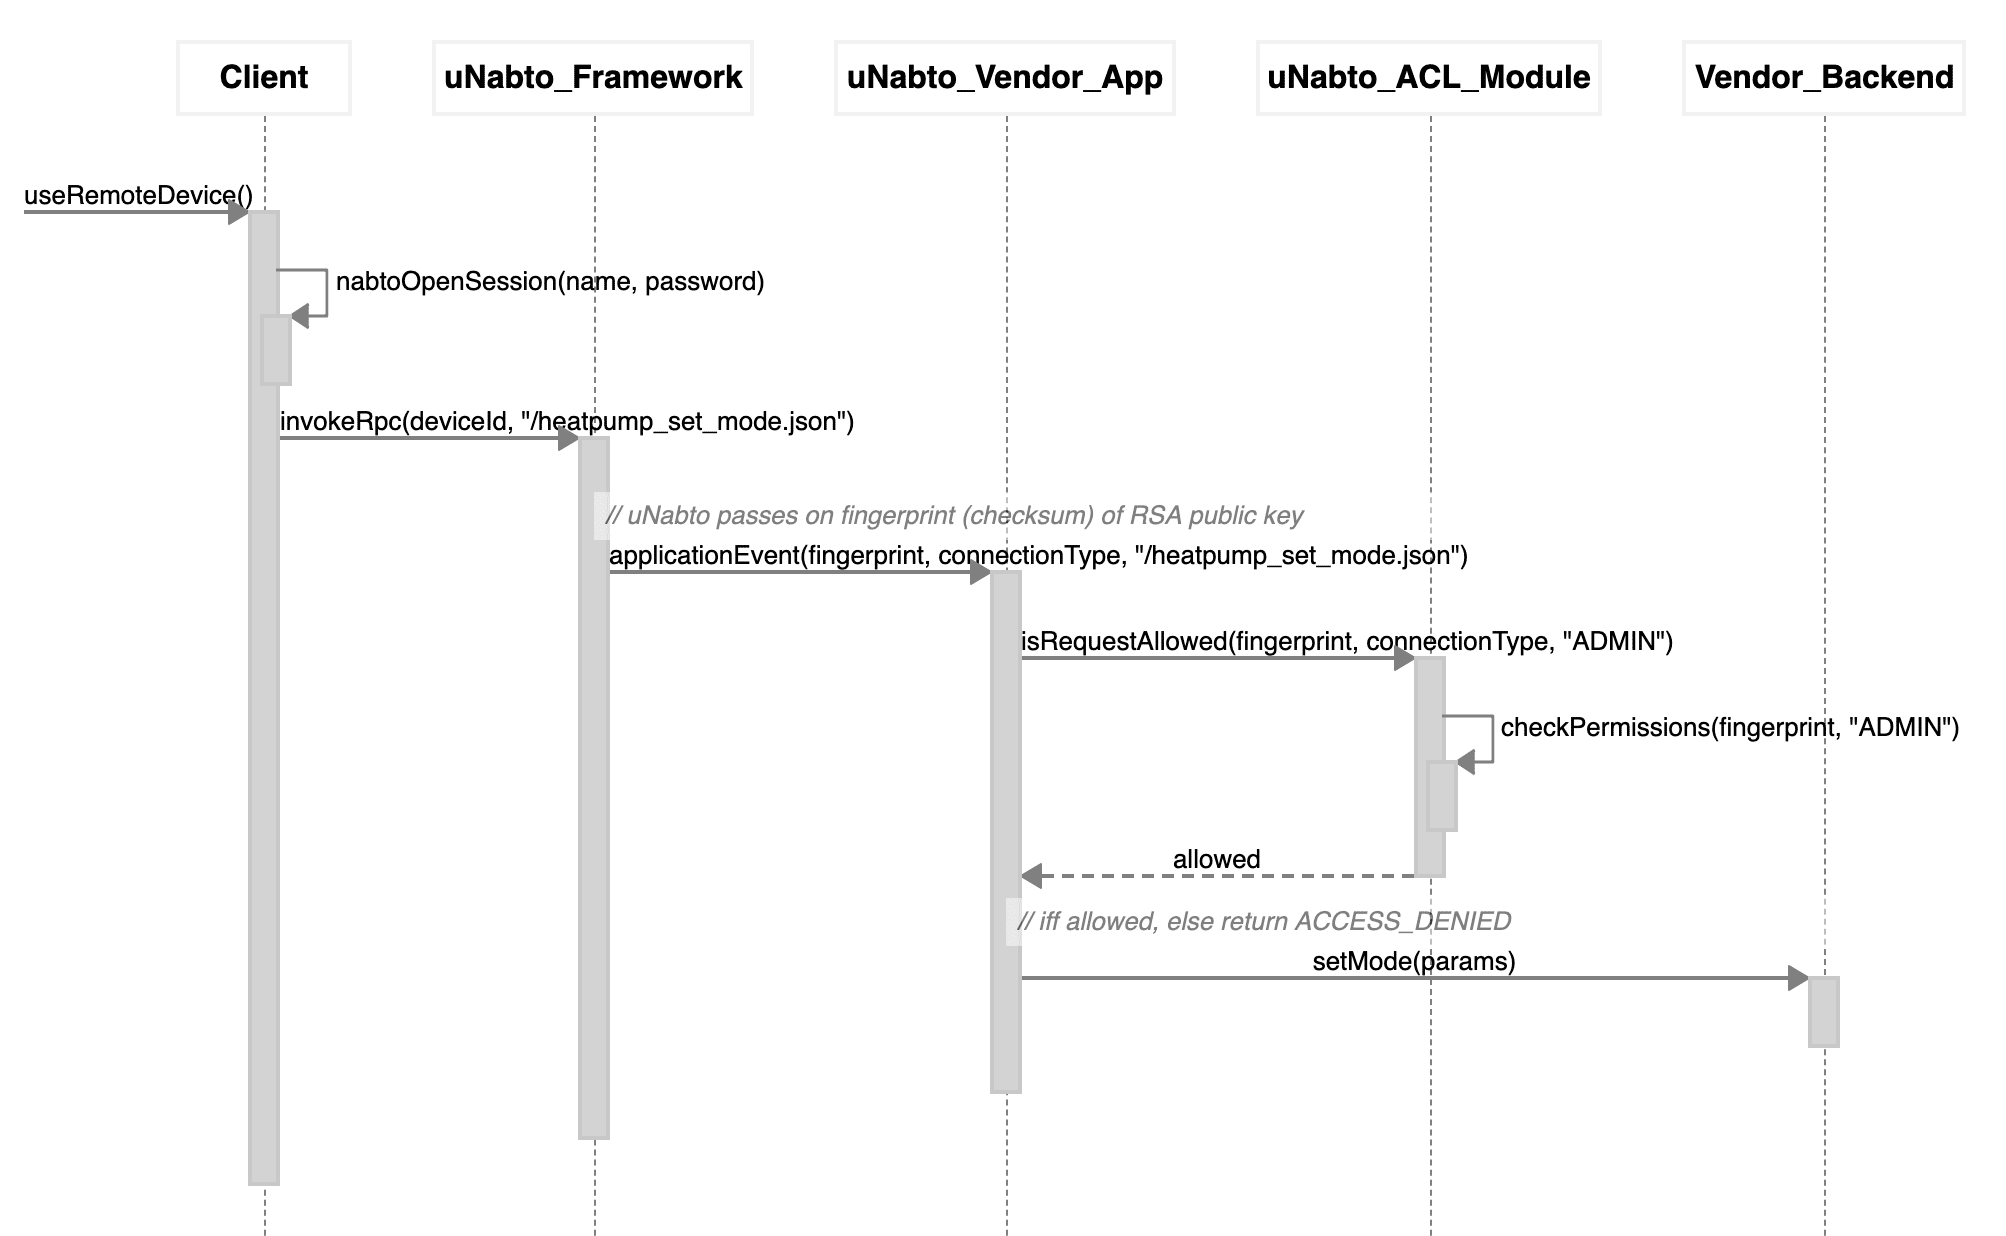
And the subsequent authorization using the ACL:
Example Software
There are already several examples that support Nabto PPKA. The most comprehensive example is the Nabto heat control example as there are clients for several platforms and full support in the device. The Nabto Tunnel reverse proxy often used for video solutions also supports the full PPKA approach and implements all the necessary RPC functions – but none of the video client demo apps support pairing (so use the nabto-cli tool for a tunnel demo with pairing).
The device stub is located here: https://github.com/nabto/appmyproduct-device-stub
The corresponding client is available for Ionic here: https://github.com/nabto/ionic-starter-nabto
… and for iOS here: https://github.com/nabto/ios-starter-nabto
The Nabto CLI tool is available here: https://github.com/nabto/nabto-cli
Implementation
To use PPKA, you must perform the following tasks (details outlined in the remainder of these two posts):
- in the device app, using the uNabto SDK and the ACL module:
- prepare ACL database
- accept incoming local connect request from local client
- allow pairing RPC invocation to update ACL database if in pairing mode
- authorize incoming RPC requests after pairing
- authorize incoming tunnel requests after pairing
- in the client app, using the Nabto Client SDK:
- create RSA keypair and open session
- discover local devices
- invoke pairing functions on the desired local device through Nabto RPC
Step 1.1: Prepare ACL Database
A simple ACL database is provided as part of uNabto as a module, documented in the ACL module README. The module is only used from application code and can hence be replaced with anything more advanced you desire.
When using the uNabto ACL database, it must be initialized when starting uNabto. In the heatpump demo, this happens as follows:
void demo_init() {
    struct fp_acl_settings default_settings;
    NABTO_LOG_WARN(("WARNING: Remote access to the device is turned on by default. Please read TEN36 \"Security in Nabto Solutions\" to understand the security implications."));

    default_settings.systemPermissions =
        FP_ACL_SYSTEM_PERMISSION_PAIRING |
        FP_ACL_SYSTEM_PERMISSION_LOCAL_ACCESS |
        FP_ACL_SYSTEM_PERMISSION_REMOTE_ACCESS;

    default_settings.defaultUserPermissions =
        FP_ACL_PERMISSION_LOCAL_ACCESS;

    default_settings.firstUserPermissions =
        FP_ACL_PERMISSION_ADMIN |
        FP_ACL_PERMISSION_LOCAL_ACCESS |
        FP_ACL_PERMISSION_REMOTE_ACCESS;

    if (fp_acl_file_init("persistence.bin", "tmp.bin", &fp_file_) != FP_ACL_DB_OK) {
        NABTO_LOG_ERROR(("cannot load acl file"));
        exit(1);
    }
    fp_mem_init(&db_, &default_settings, &fp_file_);
    fp_acl_ae_init(&db_);
    snprintf(device_name_, sizeof(device_name_), DEVICE_NAME_DEFAULT);
    updateLed();
    debug_dump_acl();
}
A summary of what happens here (details are described in ACL module README):
default_settings.systemPermissions defines which operations are permitted on the system. So when starting the demo and nothing has yet been written to the database, pairing, local and remote access is allowed. In a production system, you may want to restrict this so remote access is not necessarily enabled until the user explicitly enables this (as the warning also hints). This is the “master switch”, more fine-grained access control ensures only intended users can access as outlined below.
default_settings.defaultUserPermissions defines the permissions granted generally to new users added to the database, ie used for guests (non-admins). This user type is per default restricted to local access only.
default_settings.firstUserPermissions defines the special permissions granted to the first user added to the database – we consider this the owner of the system with admin privileges.
Note: If you do centralized access control, ie the Nabto basestation performs all access control through webhooks and/or access tokens, then it is important to remove the FP_ACL_SYSTEM_PERMISSION_LOCAL_ACCESS permission bit. This will then prevent offline scenarios – but will allow the basestation and any associated 3rd party services to control all access to the device.
Step 1.2: Accept Incoming Connect Request from Local Client
uNabto applications normally have a unabto_config.h file where uNabto compiletime configuration options from unabto_config_defaults.h can be overridden.
Per default the option NABTO_ENABLE_CONNECTION_ESTABLISHMENT_ACL_CHECK is not set (but most demo applications override this), set this to 1 in your application:
#ifndef _UNABTO_CONFIG_H_
#define _UNABTO_CONFIG_H_

#define NABTO_ENABLE_CONNECTION_ESTABLISHMENT_ACL_CHECK 1

// ... other options

#endif
When this option is set, the uNabto framework invokes the allow_client_access callback function where your application can decide if the connection should be allowed to proceed or not. A typical implementation looks like:
bool allow_client_access(nabto_connect* connection) {
    bool local = connection->isLocal;
    bool allow = fp_acl_is_connection_allowed(connection) || local;
    NABTO_LOG_INFO(("Allowing %s connect request: %s", (local ? "local" : "remote"), (allow ? "yes" : "no")));
    return allow;
}
Line 3 above allows the connection to proceed if either the user is paired (ie, the ACL database says so) or if the connection is local. This is just the first coarse-grained check, ie when the connection is established – later when actual functionality is to be used on the device, a more fine-grained permission check is done.
Step 1.3: Allow Pairing RPC Invocation to Update ACL Database if in Pairing Mode
If using the default ACL database you can just use the default ACL RPC implementation. In that case, the uNabto device’s application_event handler may look as follows where we delegate handling of the ACL RPC opcodes (11000-12000) to the ACL module:
application_event_result application_event(application_request* request,
                                           unabto_query_request* query_request,
                                           unabto_query_response* query_response) {

    NABTO_LOG_INFO(("Nabto application_event: %u", request->queryId));

    application_event_result res;

    if (request->queryId >= 11000 && request->queryId < 12000) { // default PPKA access control (see unabto/src/modules/fingerprint_acl/fp_acl_ae.c) application_event_result res = fp_acl_ae_dispatch(11000, request, query_request, query_response); NABTO_LOG_INFO(("ACL request [%d] handled with status %d", request->queryId, res));
        return res;
    }
It is recommended to take a look at the ACL module’s implementation of this function, specifically how it checks if pairing mode is active, ie if the FP_ACL_SYSTEM_PERMISSION_PAIRING bit is set in the current systemPermissions. Also note how it adds the fingerprint from the current uNabto connection to the ACL database.
Step 1.4: Authorize Incoming RPC Requests After Pairing
Let’s take a look at 3 different RPC authorization scenarios, using the heat pump demo as example:
get_public_device_info.json: This function retrieves public information from the device, useful when listing devices in the user interface in the client after discovery. In this example, we use it to tell the client which icon to use for this device type and if the device is open for pairing. From the heat pump implementation you can see there is no ACL check due to the information being considered public:
    case 10000:
        // get_public_device_info.json
        if (!write_string(query_response, device_name_)) return AER_REQ_RSP_TOO_LARGE;
        if (!write_string(query_response, device_product_)) return AER_REQ_RSP_TOO_LARGE;
        if (!write_string(query_response, device_icon_)) return AER_REQ_RSP_TOO_LARGE;
        if (!unabto_query_write_uint8(query_response, fp_acl_is_pair_allowed(request))) return AER_REQ_RSP_TOO_LARGE;
        if (!unabto_query_write_uint8(query_response, fp_acl_is_user_paired(request))) return AER_REQ_RSP_TOO_LARGE;
        if (!unabto_query_write_uint8(query_response, fp_acl_is_user_owner(request))) return AER_REQ_RSP_TOO_LARGE;
        return AER_REQ_RESPONSE_READY;
set_device_info.json: This function updates device settings and hence should only be performed by the owner. This is done in line 3 below by looking up in the ACL database that the current user’s fingerprint is associated with OWNER privileges:
    case 10010:
        // set_device_info.json
        if (!fp_acl_is_request_allowed(request, REQUIRES_OWNER)) return AER_REQ_NO_ACCESS;
        int res = copy_string(query_request, device_name_, sizeof(device_name_));
        if (res != AER_REQ_RESPONSE_READY) return res;
        if (!write_string(query_response, device_name_)) return AER_REQ_RSP_TOO_LARGE;
        return AER_REQ_RESPONSE_READY;
heatpump_get_full_state.json: This function accesses the heatpump state which should require a paired user to access, but not necessarily the owner. This is done in line 3 below by looking up in the ACL database that the current user’s fingerprint is associated with GUEST privileges, ie is just included in the ACL:
    case 20000:
        // heatpump_get_full_state.json
        if (!fp_acl_is_request_allowed(request, REQUIRES_GUEST)) return AER_REQ_NO_ACCESS;
        if (!unabto_query_write_uint8(query_response, heatpump_state_)) return AER_REQ_RSP_TOO_LARGE;
        if (!unabto_query_write_uint32(query_response, heatpump_mode_)) return AER_REQ_RSP_TOO_LARGE;
        if (!unabto_query_write_uint32(query_response, (uint32_t)heatpump_target_temperature_)) return AER_REQ_RSP_TOO_LARGE;
        if (!unabto_query_write_uint32(query_response, (uint32_t)heatpump_room_temperature_)) return AER_REQ_RSP_TOO_LARGE;
        return AER_REQ_RESPONSE_READY;
Step 1.5: Authorize Incoming Tunnel Requests After Pairing
The connection level access control listed above in step 1.2 also applies for tunnels. To control if individual ACL users can open tunnels, start by making sure the unabto_config.h file includes the following:
#define NABTO_ENABLE_TUNNEL_OPEN_ACL_CHECK 1
This means the uNabto framework invokes the unabto_tunnel_allow_client_access callback in the application code before opening a tunnel:
bool unabto_tunnel_allow_client_access(nabto_connect* connection) {
    if (no_access_control) {
        return true;
    } else {
        bool allow = fp_acl_is_tunnel_allowed(connection, FP_ACL_PERMISSION_NONE);
        NABTO_LOG_INFO(("Allowing %s tunnel open request: %s", (connection->isLocal ? "local" : "remote"), (allow ? "yes" : "no")));
        return allow;
    }
}
The ACL module helper fp_acl_is_tunnel_allowed looks up the fingerprint of the current connection in the ACL – if it is paired, the client is allowed to open a tunnel.
Pairing users prior to this is identical to what was described in step 1.4 for RPC – ie, you can use the provided default ACL manipulation RPC functions for tunnel applications as well (as shown in the default tunnel app).
Continue with the second post to learn about how to do pairing from client apps.