
Important notice: This post is about the legacy Nabto 4/Micro platform which has been superseded by the Nabto 5/Edge platform. Also see the general comparison of Nabto 4/Micro (uNabto) and Nabto 5/Edge.
Why choose FreeRTOS:
FreeRTOS is the market leading real time operating system and the de-facto standard solution for microcontrollers and small microprocessors. Few major Advantages of FreeRTOS are below
- Provides methods for multiple threads or tasks, mutexes, semaphores and software timers. Thread priorities are supported.
- Very small memory footprint, low overhead, and very fast execution.
- A tick-less mode is provided for low power applications.
Nabto with FreeRTOS:
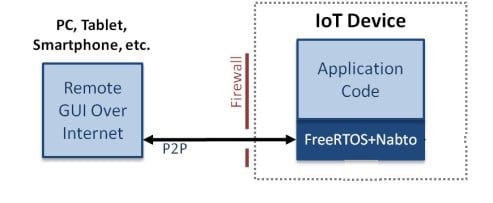
With Nabto you can easily create a remote accessible device. You integrate a simple piece of software on the device firmware and now you are able to create an apps which can securely remote access and control your device even though the device resides behind your home firewall.
This blog demonstrates how Nabto application is built using the FreeRTOS Windows simulator. Windows simulator is used to evaluate the Nabto with FreeRTOS as proof of concept to ensure the software works as expected before porting to any particular hardware with Windows platform – however it should be noted that the simulator will not exhibit real time behaviour.
Nabto with FreeRTOS is a piece of C code, when integrated into an embedded networked device, the device can be remotely accessed and controlled using a web based user interface or intelligent data acquisition system by using Nabto client APIs.
Every IoT (Internet of Things) device has a unique URL for automatic location over the Internet, and the technology allows secure, authenticated and extremely low bandwidth peer-to-peer connections to be established even when the device is deployed behind a NAT firewall. Nabto with FreeRTOS enabled IoT devices are even accessible over a local network in the absence of Internet connectivity.
The cloud infrastructure enables IoT devices to be accessed through a custom built user interface running in a smart phone app – the IoT device supplies the live data components of the interface (Example: Heatpump) by using a light weight UDP protocol.
About Nabto Cloud Console:
The Nabto Cloud Console is an IoT application platform that helps you to 1. Quickly develop high-quality client side apps using the provided APIs 2. Customize the device side application using the provided demo application. 3. The uNabto framework and the client APIs can be downloaded using the below link.
https://www.nabto.com/downloads.html
uNabto Framework:
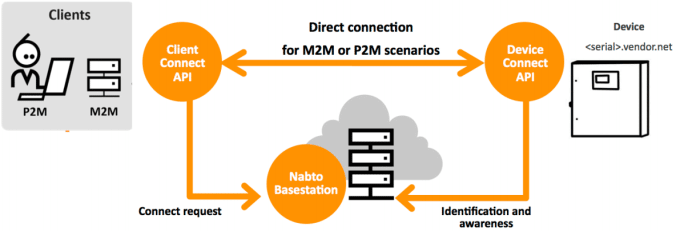
The drawing below gives a brief overview of how the Nabto platform actually work. The Device represents the smart device and the uNabto server (uNabto SDK and Device specific Platform adapters) is running on the device. As soon as device connects to the Internet it identifies itself at the Nabto Basestation, using its unique ID which is already registered in the Cloud Console.
If a Client wants to connect to the device, a connect request with the device ID is sent to the Basestation, and a direct connection to the device is established after verifying the identity of client. A client can be a native mobile app or an abstraction framework like our AMP Heat app used in this demo
Get more information on the Nabto Cloud Console and the Client/Device SDKs at console.cloud.nabto.com.
The uNabto Platform Adapter:
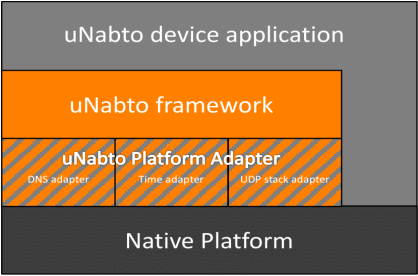
The uNabto Platform Adapter is a small component that abstracts the Native Platforms network and time functionality. The Platform Adapter is part of the uNabto server. The uNabto server is divided into two layers:
- The uNabto framework (uNabto SDK)
- The uNabto Platform Adapter abstraction layer between the framework and the Native Platform
The device specific uNabto server is readily available in the Cloud Console to port it to the FreeRTOS Windows module.
Implementation:
Nabto with FreeRTOS application securely connects your embedded device while handling networking, routing and encryption tasks. While using Nabto with FreeRTOS cloud hosting service, an embedded developer need to:
- Provide a network driver to interface FreeRTOS+UDP to their hardware platform.
- Add the Nabto with FreeRTOS source files to their project.
- Set ipconfigFREERTOS_PLUS_NABTO to 1 in FreeRTOSIPConfig.h (the FreeRTOS+UDP configuration file).
- Provide a single event handling C function to handle pre-formatted Nabto queries.
Nabto Queries:
Unique identifiers are used to distinguish between query types while data is sent to and requested from a remote networked device in a simple UDP query packet.
A query can contain zero or more request parameters based on the operation triggered by the client application. Request parameters are used to send data to the remote networked device. Nabto with FreeRTOS automatically passes request parameters into the event handling C function.
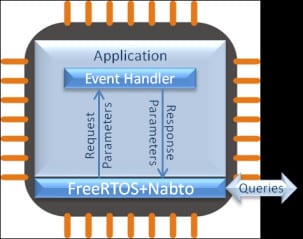
Some query types require the remote networked device to respond with data. The application developer has to pass the response parameters using the event handling C function. Queries can be sent from a web based user interface (AMP Heat app).
FreeRTOS Windows Port for Heatpump Device Stub:
Download the port library from https://github.com/nabtodaemon/FreeRTOS-Nabto and follow the below installation instructions.
This demo uses the Microsoft Visual Studio (MSVC) version of the FreeRTOS Windows simulator. The project can be build and debugged with the free Express edition of MSVC.
Steps:
- Download the source code (Freertos-Nabto.zip) and extract it.
- Ensure Microsoft Visual Studio (MSVC) is installed.
- Open the MSVC solution called FreeRTOS_Plus_UDP_with_CLI.sln, which is
located in the \FreeRTOS-Plus
Demo\FreeRTOS_Plus_UDP_and_CLI_Windows_Simulator directory. - The demo uses WinPCap to create a virtual network connection by accessing raw Ethernet data on a real network connection
Introducing the unabto_config.h configuration file:
The Nabto source files contain several constants that affect its behavior. Default values for each constant are set in unabto_config_defaults.h. To modify a value from its default setting,re-define the value in unabto_config.h (do not edit unabto_config_defaults.h).
Network configuration:
This demo project is supplied with ipconfigUSE_DHCP set to 1 in FreeRTOSIPconfig.h. If DHCP is not used a static IP address must be configured and ipconfigUSE_DHCP must be set to 0.
Steps:
- The static IP address is set by the constants configIP_ADDR0 to configIP_ADDR3. Edit these constants to appropriate values for your network. The chosen address must be compatible with the network, and unique on the network (the IP address will be compatible if its first three octets match the first three octets of other IP addresses on the same network). This step shall be skipped if DHCP is used.
- Most Windows computers have more than one physical network interface, so it is necessary to define which interface the stub will use. A mapping of interfaces to interface numbers is displayed when the tutorial application is executed (see Figure below). Set configNETWORK_INTERFACE_TO_USE to the number of the interface to use.

Device URL:
Every Nabto with FreeRTOS device on a network must have a unique URL. The URL is obtained by calling an application defined callback function pcApplicationNabtoDeviceURL().Applications that use Nabto with FreeRTOS must provide an pcApplicationNabtoDeviceURL() implementation. pcApplicationNabtoDeviceURL() can be found in main.c.
const char *pcApplicationNabtoDeviceURL(void)
{
    /* Enter your device id here */
    static const char * pcURL = "abc.xyz.trial.nabto.net";

    /* Return the URL that will be used by the device.  The URL must be in
    persistent memory (not declared on the stack of this function), and
    unique on the network.
    A unique URL can be created by prefixing the main URL with the serial
    number or MAC address of the device (or any other unique identifier).
    It is ok in this case to use a simple constant string, provided only one
    instance of this project is connected to the network at any one time, and
    that the default project configuration is not changed to allow remote
    access. */

    return pcURL;
}
Device Key:
Every Nabto with FreeRTOS device on a network has got a key associated with it. The device key is encoded in the function xStartNabtoTask() found in nabto_task.c (folder: FreeRTOS+/Source/FreeRTOS+Nabto/platforms/freertos_net/nabto_task.c)
/* Set device key */
if (!unabto_read_psk_from_hex("<device-key>", nms->presharedKey, PRE_SHARED_KEY_SIZE))
{
    vOutputString("Invalid cryptographic key specified");
    return false;
}
Local Vs Remote access:
Nabto with FreeRTOS can be configured to accept connections from local (non-internet) addresses or accept connections from remote (internet) addresses, or accept connections from both local and remote addresses simultaneously.
The unabto_config.h file supplied with this demo is configured to accept both local and remote connections.
Running the Heatpump stub:
Start the Heatpump demo by selecting “Start without Debugging” from the Visual Studio’s Debug menu. A Windows console will open displaying the available network adapters and the network configuration.

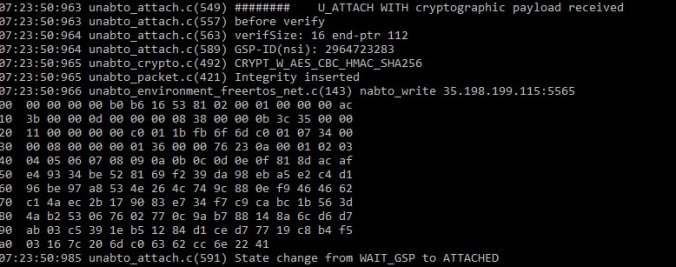
The device will try to register with the Nabto Basestation. Once the device gets registered with Basestation, you will see the message “State change from WAIT_GSP to ATTACHED” as in the below figure.
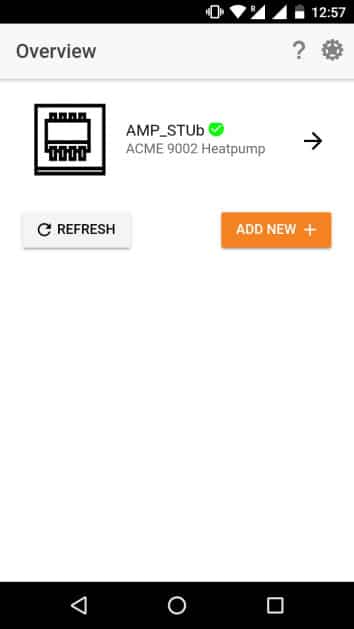
Now, using the AMP Heat app (available on Google play store and Apple app store) connect your device and verify whether it works. When the AMP Heat app is started for the first time, you need to pair your client with the device. Then on, the paired device will be automatically discovered if it is online.

FAQ:
Why I am unable to connect to the device?
The windows simulator creates a virtual network interface by reading and writing raw Ethernet data through a real network interface. Any connection issues encountered are likely to be related to the operation of the virtual interface, not the operation of the Nabto with FreeRTOS code.
Things to try if you are not able to connect to the device when it is running.
Ping Try pinging the configured IP address. If ping replies are received then it is likely the problem is not related to the network configuration.
Wired Vs Wireless network interfaces Using a wired network is preferred rather than a wireless network. If that is not possible try connecting to (or pinging) the project from a different computer on the same network.
Firewall Often in corporate environments, they enforces a policy on windows machines that prevents a uni cast response to a broadcast request. The following URL provides information on how to check if uni cast responses are allowed on your machine: http://technet.microsoft.com/enus/library/cc742429.aspx
Try temporarily disabling any firewall or other network filtering software during your testing.
Hubs and Switches Intelligent hubs and switches can shield network nodes from traffic. Try connecting through a dumb hub.