
Important notice: This post is about the legacy Nabto 4/Micro platform which has been superseded by the Nabto 5/Edge platform. Nabto Edge officially supports ESP32 – but the tutorial outlined in this post has not yet been migrated.
This blog post is written by guest writer Michael Paar from our developer partner Connictro.
Introduction
As a development partner, we have received a request to provide a solution for controlling Modbus from ultra-low-cost/low power WiFi modules like Espressif ESP32, inspired by the blog post about controlling Modbus devices via the Nabto P2P Platform from a Raspberry Pi.
In brief, considering the prices and power consumption budget, there is a lot of optimization potential in that:
- Raspberry Pi’s are not expensive (about € 35,00), but adding a cheap USB-RS485 converter and cables/power supply this easily adds at least another € 15,00- or €50,00 in total – that can be made much cheaper.
- A current-generation Raspberry Pi draws about 1A from the USB 5V power supply, which equals 5W – imagine running that for a year at a price of € 0.30 per kWh, it will add about € 13,00 to the yearly electricity bill.
- Fortunately, now ultra-cheap, low-power WiFi-modules like the Espressif ESP32 are available which can do the same for less than 1/10th of the hardware cost and power budget, and a Nabto platform adapter is already available for it.
- As hardware for our demo, we have chosen an Espressif ESP-WROOM32-DevKitC (available for about € 6,00 from China including shipping, the raw ESP-WROOM-32 module can be purchased for less than € 2.50 in mass-production quantities), furthermore an 3.3V UART to RS485/RS422 converter (we got it for € 3.33 including shipping – for a real-world custom design just the converter chip would be used for a fraction of the cost). Any low-cost 5V USB power supply and a cheap USB-A to micro-USB-B cable can be used with that setup.
- With our full ESP32-based solution deployed – without spending any effort for further power optimization – we measured between 0.3W and 0.35W, which contributes less than € 1,00 per year to the electricity bill if running continuously – quite a saving compared to the Raspberry Pi, isn’t it?
Besides porting the existing demo onto the ESP32 – while maintaining 100% compatibility – our goal was also to enhance it, to be closer to a real product and have less work to do to change the demo into a product.
So, we added an Access Point mode for WiFi configuration (which was available from the open source community) and we download all the configuration from a secure server to avoid having to define any credentials at compile time as the existing Nabto ESP32 demo – this is much closer to a production-ready solution.
Getting Started
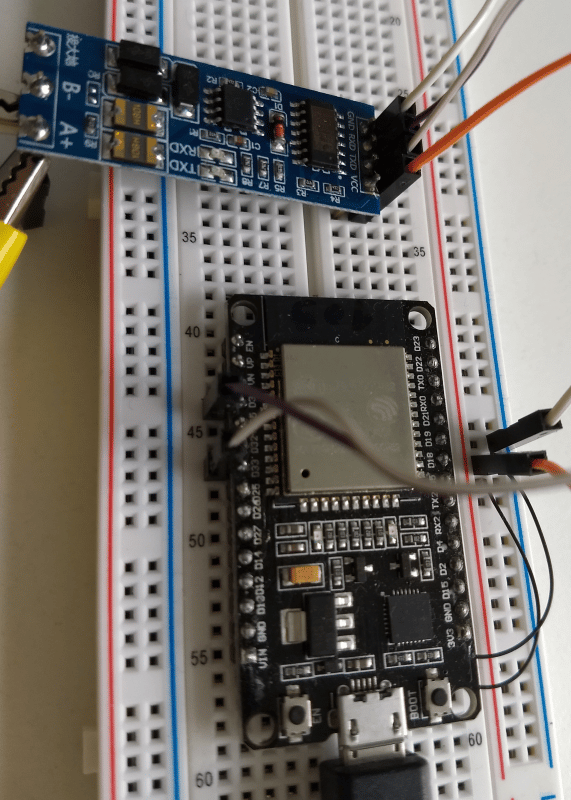
To be able to show and test, we have chosen two Modbus devices: A temperature/humidity sensor and a 4-port relay card. Using an USB-to-RS485 adapter connected to a Windows PC, using some free Modbus control software, first the slave addresses of the devices need to be changed – they come with 1 as default, and at least one of the devices need to be set to a different address. Then connect all Modbus devices and the converter (A+ and B- lines). The converter already comes with Modbus termination resistors installed. However, for a real-world deployment with long wires, the terminating resistors need to be placed accordingly (at the end of the bus). A small test setup like this will, however, work fine with the built-in termination.
From the ESP32, connect GND and +3.3V to power the converter, connect TxD to GPIO 33 of the ESP32 (pin 8 on the DevKitC board) and RxD to GPIO34 (pin 5), using the unchanged configuration.
This type of converter carries out direction switching automatically and does not need the RTS signal from the ESP32 – if you have a different converter which needs it, connect GPIO12 (pin 13 on the DevKitC) to RTS.
The DevKitC is powered by a single micro USB +5V power source.
For the Modbus devices we have chosen, an additional external +12V power supply is needed.
On the device software side, first, the Espressif ESP-IDF environment needs to be installed (click here for instructions). We used Ubuntu Linux, but other platforms should work as well. Once ESP-IDF has been successfully set up (click here for detailed instructions on how to clone the repository), choose the correct uNabto version and how to create and where to place the configuration files. You’ll also find information about the Modbus hardware and possible shopping links inside.
We are happy to host config files on our server for very few devices (if you decide not to change the default configuration), but we strongly recommend changing the path and server certificate to point to your own service.
Once the ESP32 software starts up, it comes up in Access Point mode (we used Tony Pottier’s Wifi Manager). Connect using a mobile phone to SSID “nabto-modbus-gw-
To change the access point, place the ESP32 powered on, out of range and wait for 5 minutes (it retries 5 times with a 1-minute timeout before deleting the stored credentials and entering the access point mode again), or you can delete the NVS (non-volatile storage) from the ESP-IDF tools.
Special care was taken in designing the device firmware and FreeModbus enhancements in a real-time embedded multi-core environment to leave headroom for other functionality since the ESP32 with its dual-core MCU is very powerful and can run many more tasks in parallel (think about replacing local microcontrollers, handling sensors or even lower-end surveillance cameras). In testing, we observed that the ESP32 deployment works in a very stable manner and also for a long period of time.
Stay tuned for future enhancements – think about an ultra-low-cost Modbus sniffer, example OTA (over-the-air) upgrade of device firmware, and further enhancements. If you have any requirements on deploying this demo in a real-life application, or help with deploying Nabto on any embedded MCU including such low-cost Wi-Fi modules, or need complete solutions, please don’t hesitate to contact us by e-mail at [email protected].