
Important notice: This post is about the legacy Nabto 4/Micro platform which has been superseded by the Nabto 5/Edge platform. Also see the general comparison of Nabto 4/Micro (uNabto) and Nabto 5/Edge.
The experimental open-source project Dartino enables you to write software for embedded systems using the modern Dart language and a set of libraries, that let you be highly productive. So why not add another powerful library? Thanks to improvements to the FFI library in the latest Dartino SDK, we are now able to use the uNabto framework from within Dartino!

Note: Due to remaining limitations of the Dartino FFI library this is currently only working on a local PC. Thanks to the Dartino team this might be resolved in the near future…stay tuned!
Why use uNabto in your Dartino solution?
Have you ever thought about connecting to your embedded system running Dartino from outside your local network without nerve-racking router and firewall configurations or heavy and intransparent cloud services? Running the uNabto server on your embedded system, you can establish a fast and secure Peer-to-Peer connection using only a static ID – from everywhere, no matter what is in between.
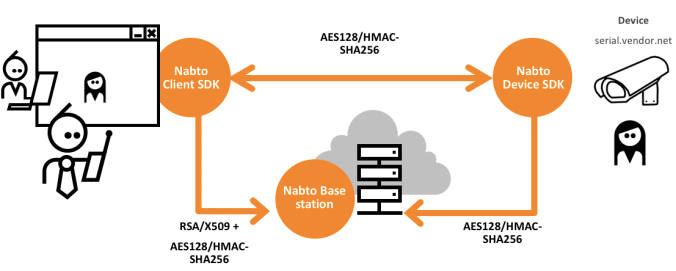
So how does Nabto do this? The drawing below gives a brief overview. Your embedded system represents the Device running the uNabto server. As soon as it connects to the internet it identifies itself at the Nabto Basestation, using its unique ID. If a Client wants to connect to the embedded system, a connect request with the ID is sent to the Basestation, and a direct connection to the device is established. A client can be a HTML page running in a desktop browser extension (IE, Firefox) or the Nabto Mobile App (iOS, Android), or a custom Nabto API Client. If you prefer Cordova also check out our recently released Nabto Cordova Plugin.
Get the sample application
We published a sample application including the uNabto Dartino library on GitHub. In order to set it up, follow the three steps below.
Step 1: Clone the repository
$ git clone --recursive https://github.com/nabto/unabto-dartino $ cd unabto-dartino
Step 2: Download and unzip the latest Dartino SDK
Linux:
$ curl "https://storage.googleapis.com/dartino-archive/channels/dev/raw/0.4.0-dev.0.0/sdk/dartino-sdk-linux-x64-release.zip" -o "/tmp/dartino-sdk.zip" $ unzip /tmp/dartino-sdk.zip
Mac OS:
$ curl "https://storage.googleapis.com/dartino-archive/channels/dev/raw/0.4.0-dev.0.0/sdk/dartino-sdk-macos-x64-release.zip" -o "/tmp/dartino-sdk.zip" $ unzip /tmp/dartino-sdk.zip
Step 3: Build the C library
$ mkdir build $ cd build $ cmake .. $ make $ cd ..
Use the sample application
The sample application acts as an embedded device that controls a virtual living room light. To connect to the application we first need to assign a unique Device ID and a pre-shared encryption Key to it. You can get them from console.cloud.nabto.com after adding a new Device. Both id and key are passed as strings to the constructor of the uNabto server:
main() {
  // Configure the uNabto server with a server ID and a pre-shared key obtained
  // from `console.cloud.nabto.com`.
  var unabto = new UNabto("devicename.demo.nab.to", "35d0dca...");
You can now fire up the application on you local PC with the Dartino tool:
$ ./dartino-sdk/bin/dartino run src/app.dart
You should see a log printout similar to this:
15:18:54:118 unabto_common_main.c(127) Device id: 'devicename.demo.nab.to'
15:18:54:118 unabto_common_main.c(128) Program Release 123.456
15:18:54:118 unabto_app_adapter.c(698) Application event framework using SYNC model
15:18:54:118 unabto_context.c(55) SECURE ATTACH: 1, DATA: 1
15:18:54:118 unabto_context.c(63) NONCE_SIZE: 32, CLEAR_TEXT: 0
15:18:54:118 unabto_common_main.c(206) Nabto was successfully initialized
15:18:54:118 unabto_context.c(55) SECURE ATTACH: 1, DATA: 1
15:18:54:118 unabto_context.c(63) NONCE_SIZE: 32, CLEAR_TEXT: 0
15:18:54:118 unabto_attach.c(787) State change from IDLE to WAIT_DNS
15:18:54:118 unabto_attach.c(788) Resolving dns: devicename.demo.nab.to
uNabto version 123.456.
15:18:54:330 unabto_attach.c(809) State change from WAIT_DNS to WAIT_BS
15:18:54:353 unabto_attach.c(474) State change from WAIT_BS to WAIT_GSP
15:18:54:364 unabto_attach.c(266) ######## U_INVITE with LARGE nonce sent, version: - URL: -
15:18:54:375 unabto_attach.c(575) State change from WAIT_GSP to ATTACHED
The uNabto server is now ready and you can connect to it from any client. When entering you device ID into your browser or Nabto App, you can see the uNabto Demo client. Using the light switch you can now turn the virtual living room light on and off from everywhere!

Light 1 turned ON! Light 1 turned OFF!
For demonstration purposes, the example application closes the server connection after ~10 seconds.
The sample application in detail
The sample application is quite straightforward since all complicated interfacing to the native C library is done in the uNabto library. We only need to include it with
import 'unabto.dart';
In the main() function we construct the uNabto server object by passing the Device ID and the pre-shared Key as parameters. However, the server is started later with the init() function. You also might want to check if there were any errors doing that.
  var unabto = new UNabto("devicename.demo.nab.to", "35d0dca...");

  // Get version information.
  print("uNabto version ${unabto.version}.");

  // Attempt to init and start the server.
  int result = unabto.init();
  if (result != 0) {
    print("Init error: $result.");
  } else {
To handle incoming events from the client we register handler functions for every query ID. We’ll come back to the handlers later on.
    // Register two event handlers for the `light_write.json` and
    // `light_read.json` queries.
    unabto.registerReceiver(1, onLightWrite);
    unabto.registerReceiver(2, onLightRead);
You can now do other stuff. The sample application just sleeps for 10 seconds to demonstrate how to close the uNabto server in the end.
    // This is where the main app code would usually run.
    // In this sample we just sleep a bit.
    sleep(10000);

    // Clean-up: Deallocate foreign memory and functions.
    unabto.close();
The following handler takes care of the query with ID #1. It reads the light’s ID and the light’s new state from the incoming readBuffer. The new state is applied to the virtual light. Afterwards, it returns the new state to the client by writing it to the outgoing writeBuffer.
void onLightWrite(UNabtoRequest appRequest, UNabtoReadBuffer readBuffer,
    UNabtoWriteBuffer writeBuffer) {
  // Read the request parameters.
  int lightId = readBuffer.readUint8();
  int lightOn = readBuffer.readUint8();

  // Set the light state.
  int lightState = setLight(lightId, lightOn);

  // Write the response parameter.
  writeBuffer.writeUint8(lightState);
}
The following handler takes care of the query with ID #2. It reads requested light’s ID from the incoming readBuffer, retrieves the state of the virtual light and returns the light’s state to the client by writing it to the outgoing writeBuffer.
void onLightRead(UNabtoRequest appRequest, UNabtoReadBuffer readBuffer,
    UNabtoWriteBuffer writeBuffer) {
  // Read the request parameters.
  int lightId = readBuffer.readUint8();
  int lightState = readLight(lightId);

  // Write the response parameter.
  writeBuffer.writeUint8(lightState);
}
Diving deeper
If you want to explore the whole available interface of the uNabto library have a look at it on GitHub. It also demonstrates how to use the Dartino FFI library to access a foreign library and work with its structures and byte arrays.
Finally, if you want to modify the underlying uNabto C library checkout the files in this directory. For example, In the unabto_config.h you can turn off the logging or disable remote connections.